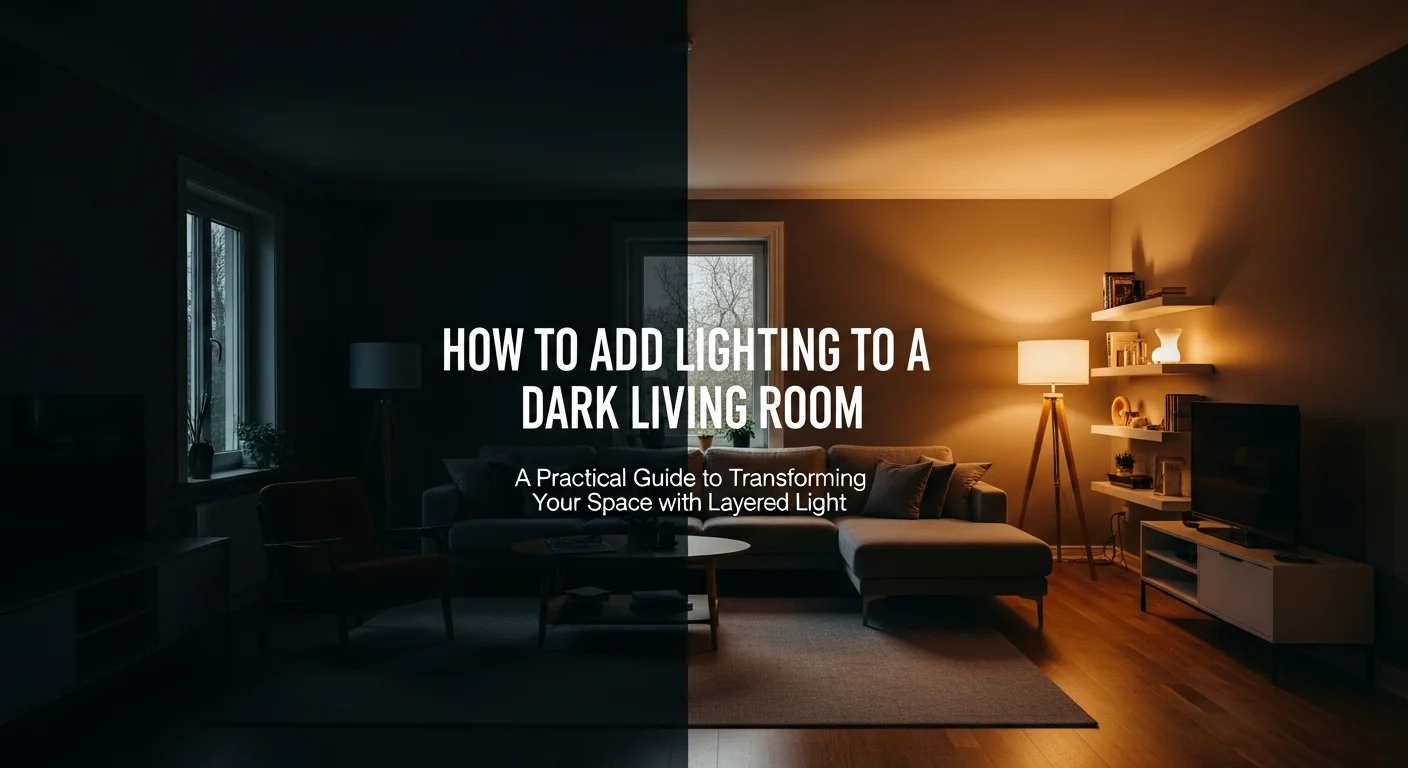
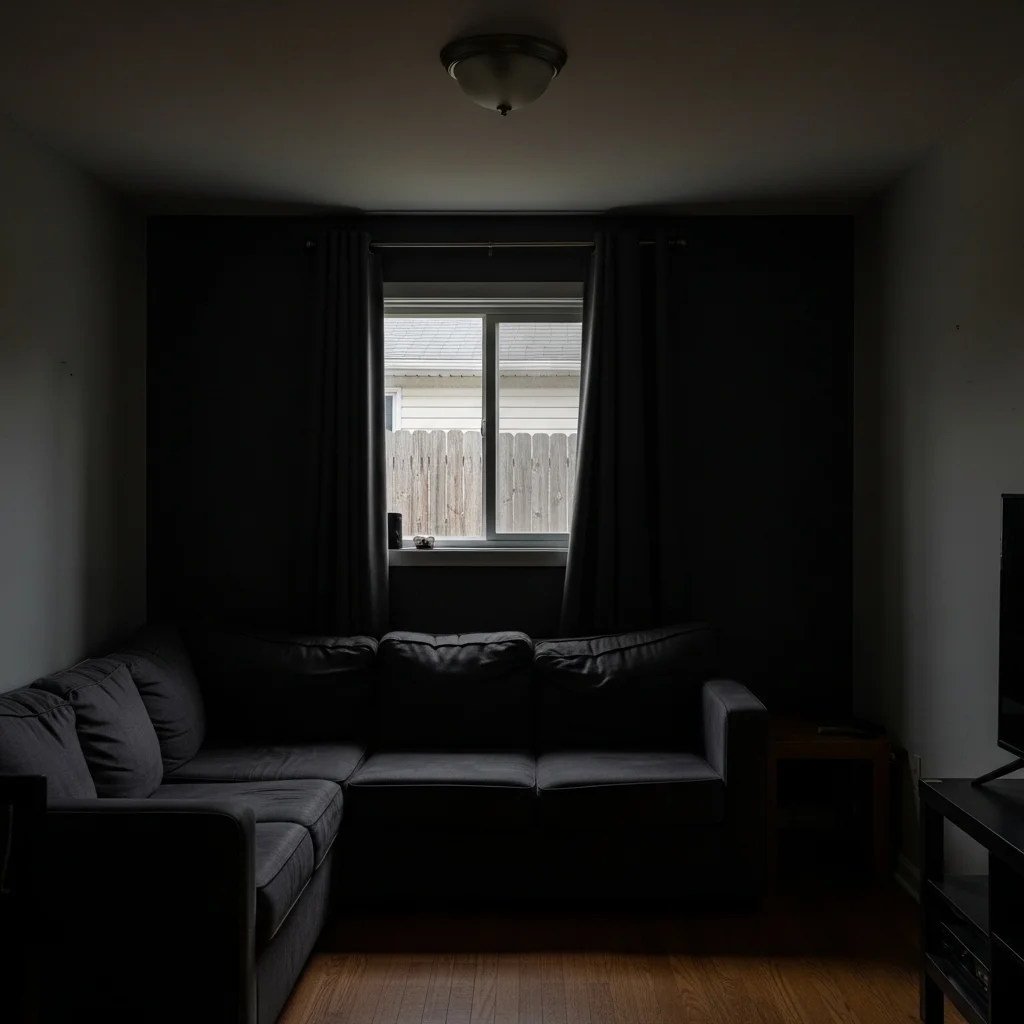
I’ll never forget the first apartment I rented after college. The living room had exactly one overhead light fixture, a sad, builder-grade dome that cast a yellowish pall over everything. By 4 PM in winter, the space felt like a cave. I spent far too many evenings squinting at books and straining to see the TV clearly before I finally figured out that lighting wasn’t just about brightness; it was about layering, placement, and understanding what makes a space feel genuinely welcoming.
If you’re dealing with a dark living room right now, you’re probably experiencing that same sense of frustration. Maybe you’ve got limited windows, northern exposure, or a layout that just seems to swallow light. The good news? You don’t need to knock down walls or install skylights (though those certainly help). With some strategic thinking about light sources and placement, even the gloomiest living room can become a space you actually want to spend time in.
Start By Understanding Why Your Living Room Is Dark
Before you start buying lamps, it helps to figure out what’s actually causing the problem. I’ve been in living rooms that felt dark for completely different reasons, and the solutions varied accordingly.
Limited natural light is the obvious culprit. Maybe you’ve got small windows, or they face north (which in the Northern Hemisphere means indirect sunlight most of the day). Perhaps there’s a building, tree, or overhang blocking sunlight. I once lived in a townhouse where the neighbor’s fence sat just six feet from our living room window. You can imagine how much sun got through.
Inadequate artificial lighting is just as common. Many living rooms were designed with a single ceiling fixture in mind, which simply isn’t enough. That overhead light creates harsh shadows and doesn’t reach into corners or seating areas effectively.
Color and material choices play a bigger role than most people realize. Dark walls, heavy curtains, and furniture that absorbs rather than reflects light can make even well-lit spaces feel dim. I learned this the hard way when I painted an accent wall charcoal gray, which looked stunning in the paint store, turned my living room into a dungeon.
The Three-Layer Approach That Actually Works
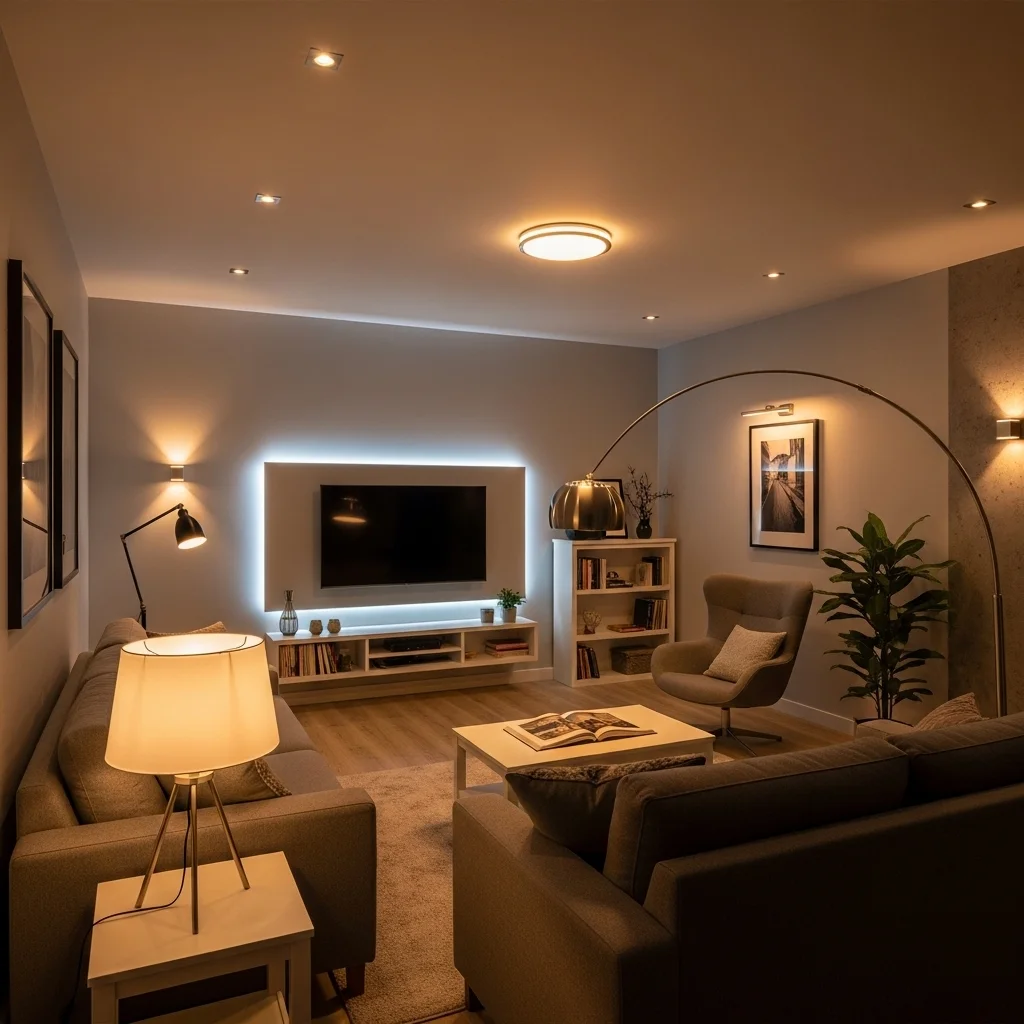
The single most important concept I’ve learned about lighting is this: you need layers. Relying on one type of light source is like trying to cook with only a microwave; technically possible, but you’re missing out on so much.
Ambient Lighting: Your Foundation
This is your general, overall illumination. In most living rooms, ambient light comes from ceiling fixtures, recessed lights, or large floor lamps. The goal here isn’t to spotlight anything specific it’s to raise the baseline brightness of the entire space.
If you have a central ceiling fixture, the easiest upgrade is simply changing the bulb. I cannot overstate how much difference this makes. Swap out that 60-watt equivalent for a 100-watt equivalent LED. Just make sure your fixture is rated for the wattage. LED bulbs run cooler than incandescent, so you’ve got more flexibility than you might think.
For rooms without ceiling fixtures (or where adding one isn’t practical), torchiere floor lamps work beautifully. These are the tall lamps that direct light upward toward the ceiling. The light bounces back down, creating a soft, diffused glow throughout the room. I’ve used these in rental apartments where I couldn’t modify the electrical system; they’re genuinely transformative.
If you own your home and can do some electrical work, recessed lighting is worth considering. I had four recessed lights installed in my current living room, positioned roughly in the corners of the space. It cost about $800 with an electrician, but the even distribution of light eliminated the dark corners that used to plague the room.
Task Lighting: For Specific Activities
This is lighting with a purpose, reading, working on a laptop, doing crossword puzzles, whatever you actually do in your living room. Task lighting should be adjustable and positioned where you need it.
Table lamps on side tables next to your sofa or reading chair are the classic solution. Here’s something I wish someone had told me earlier: the bottom of the lampshade should be at eye level when you’re seated. Too high, and the light shoots over your head. Too low, and you’re getting glare in your eyes.
I’ve got a swing-arm wall sconce next to my favorite reading chair, and it’s possibly my best lighting decision ever. It saves table space, can be positioned exactly where I need it, and looks pretty sharp too. Installation required an electrician since it needed to be hardwired, but plug-in versions exist if you’ve got an outlet nearby.
Arc floor lamps are another favorite for task lighting. They curve over seating areas, providing overhead illumination without requiring ceiling installation. I used one behind my sofa for years, it lit up the entire couch area beautifully for reading or game nights.
Accent Lighting: The Secret to Atmosphere
This is where your living room goes from merely functional to actually inviting. Accent lighting highlights specific features, creates visual interest, and adds depth to the space.
Picture lights above artwork, LED strip lighting behind the TV or along shelving, uplighting for plants or architectural features, these are all accent lights. They’re not essential for seeing, but they make an enormous difference in how the room feels.
I installed simple LED puck lights inside a bookshelf unit, and guests always comment on how cozy the space feels now. The warm glow highlighting books and decorative objects creates genuine ambiance. The entire installation took maybe 20 minutes and cost under $40 for battery-operated pucks.
If you’ve got any architectural details, exposed beams, textured walls, or alcoves, consider washing them with light. I’ve seen uplighting transform ordinary ceiling beams into stunning focal points. Even a simple floor can be aimed at a textured wall, which creates beautiful shadows and depth.
Choosing the Right Bulbs (Yes, It Actually Matters)
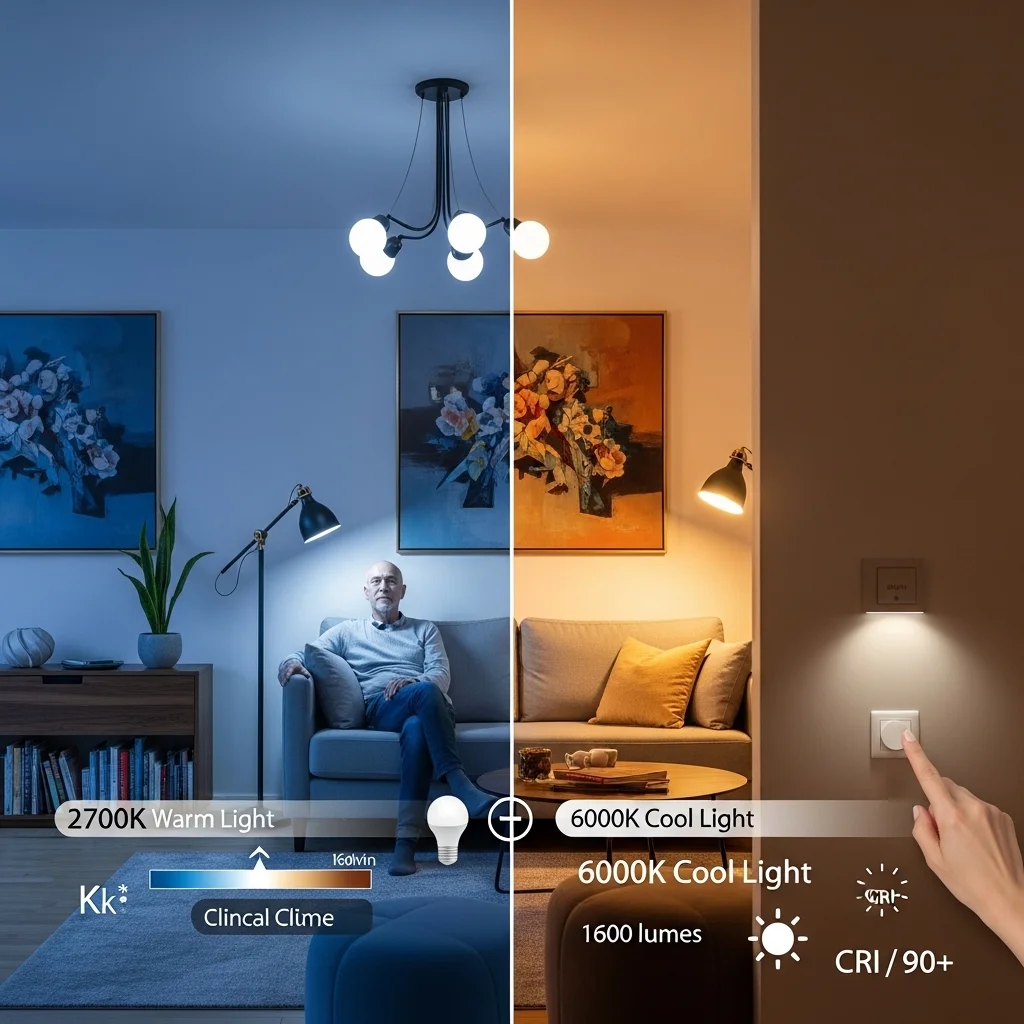
I used to think a bulb was a bulb. Then I brought home some LED bulbs on sale and turned my living room into what resembled a hospital waiting area. The color temperature was all wrong, and no amount of lighting layers could fix that sterile feeling.
Color temperature is measured in Kelvin (K). Lower numbers (2700K-3000K) give you warm, yellowish light similar to traditional incandescent bulbs. Higher numbers (5000K-6500K) produce cool, bluish light that feels more clinical.
For living rooms, I almost always stick with 2700K-3000K. It feels comfortable, relaxing, and makes skin tones look natural. Save the cooler temperatures for task-heavy spaces like home offices or garages.
Brightness is measured in lumens. For general living room ambient lighting, you want roughly 1,500-3,000 lumens total, depending on room size. A standard 100-watt equivalent LED bulb produces about 1,600 lumens, so you can do the math based on your space.
Don’t forget about CRI (Color Rendering Index), which measures how accurately colors appear under the light. Anything above 80 is fine, but 90+ is noticeably better. This matters when you’ve got artwork, colorful furniture, or you just want things to look like they do in natural daylight.
Dimmability is non-negotiable for me now. Being able to adjust lighting based on time of day or activity makes such a difference. Just make sure both your bulbs AND your dimmer switch are compatible, not all LEDs play nicely with all dimmers, and the buzzing sound from incompatible combinations is maddening.
Practical Solutions I’ve Actually Used
Let me walk you through some specific scenarios and what worked (or didn’t).
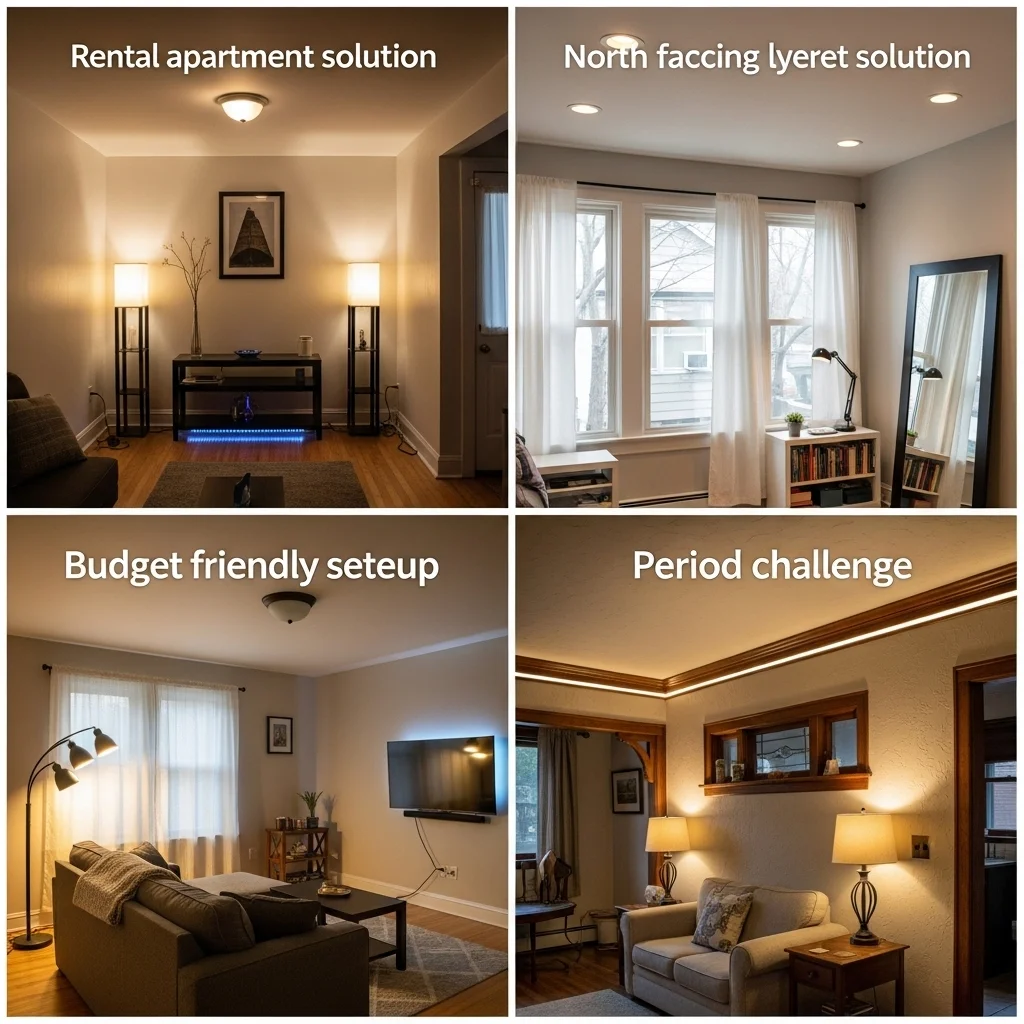
The rental apartment problem: You can’t modify electrical, and you’re stuck with one ceiling fixture and limited outlets. My solution was a combination of battery-operated LED strips under a console table, two torchiere floor lamps in opposite corners, and table lamps on the end tables. The power strip situation was admittedly messy, but the lighting itself worked beautifully. Total cost: around $200.
The north-facing window situation: My current living room has large windows that face north. Lovely even light, but never really bright. I maximized natural light by using sheer curtains instead of heavy drapes, keeping the windowsills clear, and placing a large mirror on the wall opposite the windows to reflect what light does come in. For artificial lighting, I went with recessed ceiling lights (four fixtures), accent lighting on the bookshelf, and table lamps for reading. The layered approach means the room feels bright even on gray days.
The budget-conscious approach: When money was tight, I prioritized a few key changes: upgraded all bulbs to brighter, warmer LEDs (maybe $30 total), added one good floor lamp with a three-way bulb for adjustability ($60), and stuck inexpensive LED strip lights behind the TV ($15). The difference was night and day compared to the cost.
The period home challenge: Older homes often have beautiful architectural details but terrible lighting infrastructure. In my friend’s 1920s bungalow, we added picture rails with integrated LED strips that washed the walls with light while highlighting the original molding. We also used period-appropriate table lamps with modern LED bulbs inside. The key was balancing historical character with functional modern lighting.
Common Mistakes I’ve Made (So You Don’t Have To)
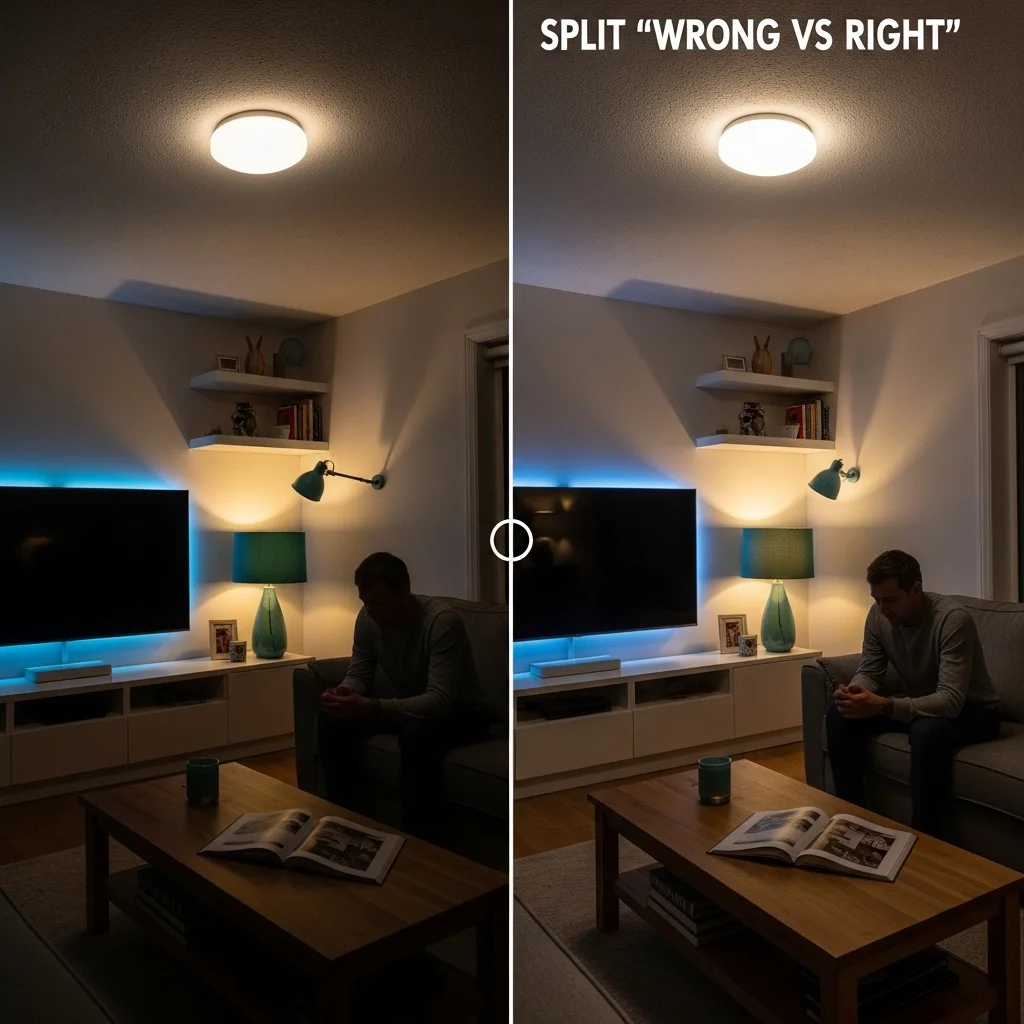
Overhead lighting only: I already mentioned this, but it’s worth repeating. That single ceiling fixture creates harsh shadows under chins, makes people look tired, and emphasizes every imperfection in your ceiling texture. Layer your lighting.
Buying cheap dimmer switches: I installed a $7 dimmer from the hardware store and couldn’t figure out why my LED bulbs hummed and flickered. A proper LED-compatible dimmer ($25-40) solved it instantly. Buy the right tool the first time.
Ignoring lamp shade design: Dark lampshades absorb light. Opaque shades direct light only up and down. If you want maximum light diffusion, choose lighter-colored shades in cream, white, or light linen. I had beautiful dark teal shades that looked gorgeous but made my lamps nearly useless for actually lighting the room.
Positioning lamps in corners: It seems intuitive that corners are dark, so put lights there. But lights shoved into corners mostly illuminate the walls rather than the usable living space. Pull lamps away from walls, position them near seating, and you’ll get far better functional light.
Forgetting about light bulb warmth consistency: Mixing 2700K and 5000K bulbs in the same room creates a weird, disjointed feeling. Stick with the same color temperature throughout, or at least within the same zone. I mixed temperatures once and the room felt subtly “off” until I figured out the problem.
Over-relying on accent lighting: Those LED strips and picture lights are fantastic for atmosphere, but they won’t actually light your room. I’ve seen living rooms with beautiful accent lighting where you still couldn’t read comfortably. Make sure your ambient and task lighting are handled first.
Maximizing Natural Light (The Free Option)
Before you spend money on fixtures and bulbs, squeeze every bit of natural light you can from your windows.
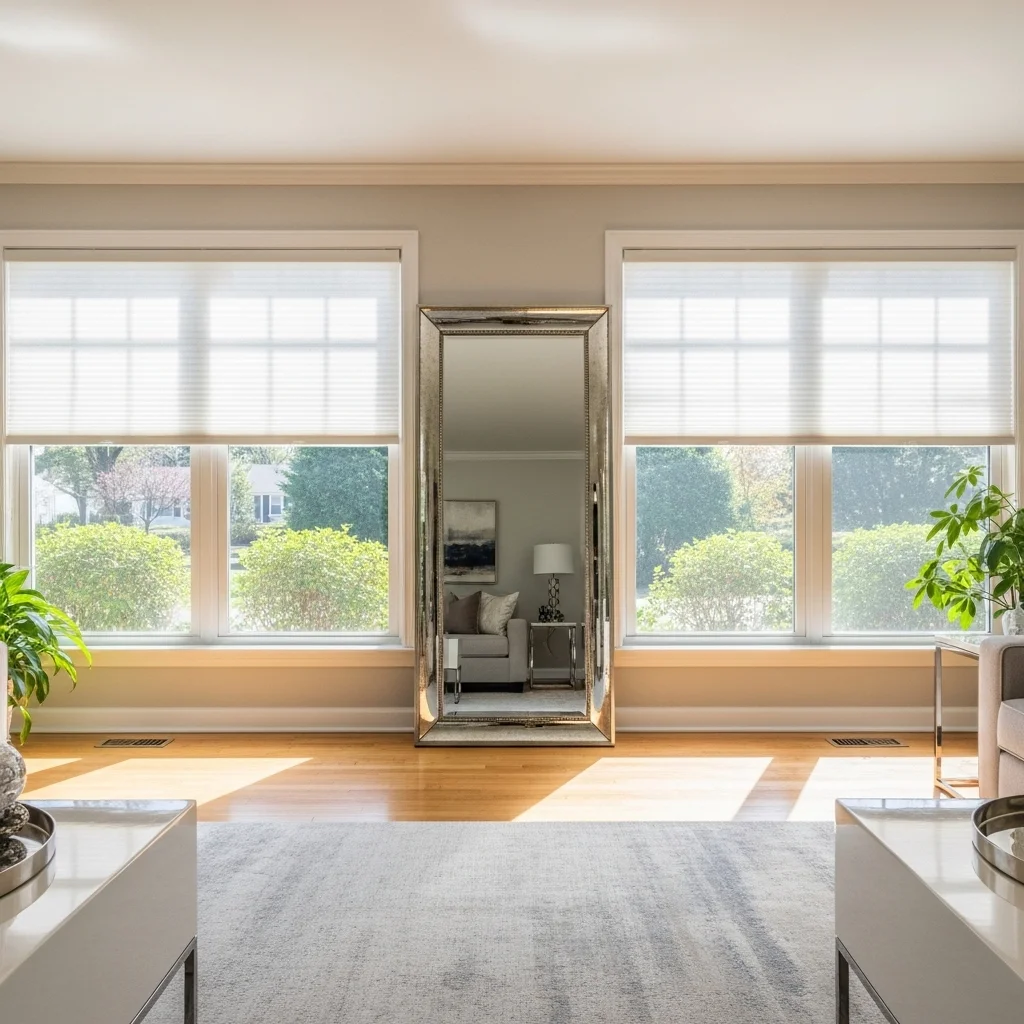
Window treatments matter enormously. Heavy, dark curtains can block 30-50% of incoming light even when “open.” I switched from heavy panels to sheer cellular shades and gained what felt like another window’s worth of light. If privacy isn’t an issue during the day, go bare or use top-down/bottom-up shades that let light in while blocking the view at eye level.
Clean your windows. I know, it’s obvious, but dirty windows genuinely block noticeable amounts of light. I wash mine twice a year (okay, I intend to twice a year it’s more like annually), and the difference is real.
Trim outdoor vegetation if you own your home. That charming tree outside your window might be casting more shade than you realize. I pruned back some overgrown shrubs and instantly gained better natural light, plus improved airflow.
Reflective surfaces strategically placed can bounce light around the room. Mirrors are the obvious choice, but glossy furniture finishes, metallic accents, and even light-colored, smooth area rugs help. I positioned a large leaning mirror across from my main window, and it genuinely makes the room feel brighter and more spacious.
Paint matters. If you’re willing to paint, lighter wall colors reflect 60-90% of light (depending on the shade), while dark colors might reflect only 10-30%. I’m not saying you need stark white walls, but even moving from a medium gray to a soft greige can dramatically increase perceived brightness.
Smart Lighting: Is It Worth It?
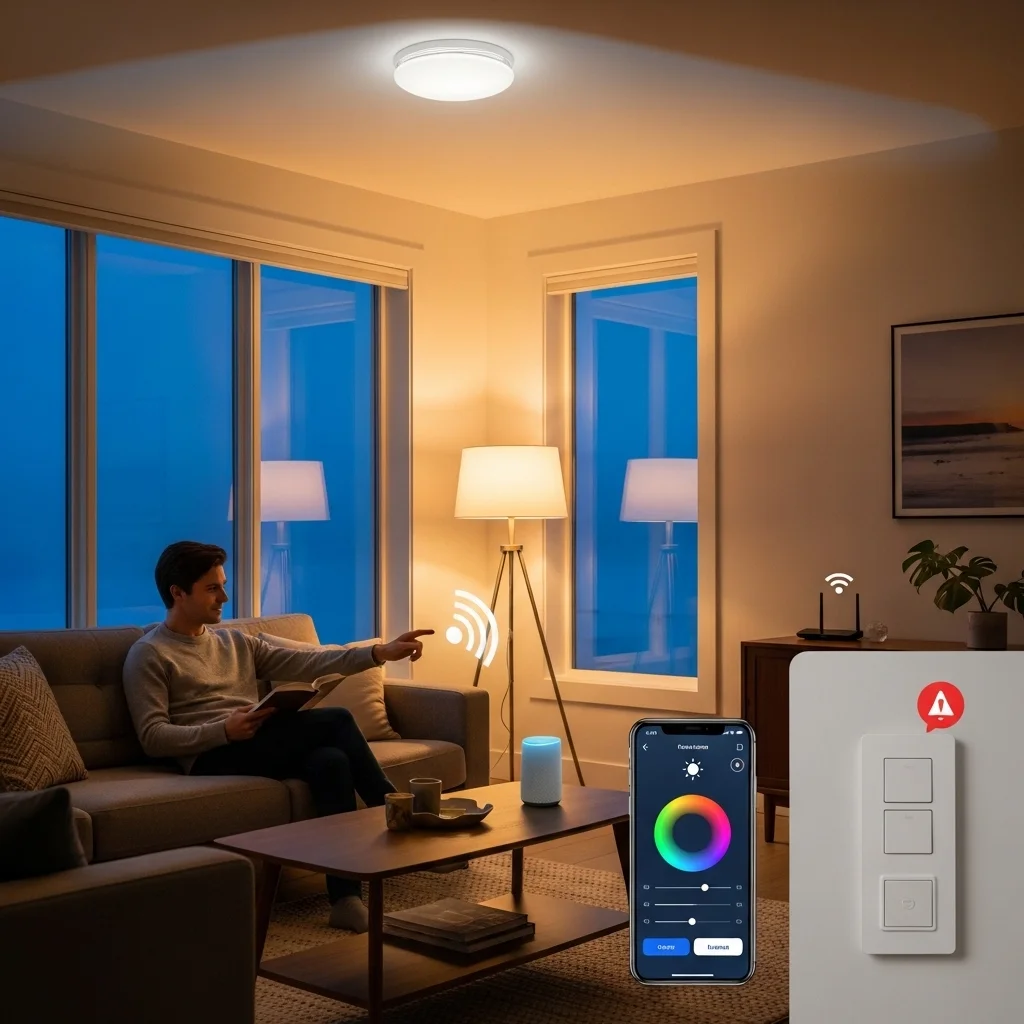
I was skeptical about smart bulbs for years. They seemed gimmicky and overpriced. Then I tried them, and… well, I’m still somewhat skeptical, but there are legitimate benefits for dark living rooms.
Scheduling means your living room can automatically brighten as daylight fades, compensating for the changing natural light. I’ve got mine set to gradually increase brightness starting around 4 PM in winter. It’s subtle, but I no longer have that moment where I suddenly realize I’ve been sitting in increasing dimness for an hour.
Color temperature shifting throughout the day can be pleasant. Warmer tones in evening, slightly cooler during the day. Some people swear by this for maintaining circadian rhythms. I find it nice but not essential.
Voice control is genuinely convenient when you’re settled on the couch with a book and realize the light needs adjusting. “Alexa, brighten the living room” beats getting up.
The downsides: Smart bulbs cost more (often $10-15 per bulb versus $2-4 for regular LEDs), require decent Wi-Fi, and can be frustrating when the connectivity is flaky. I’ve had instances where the internet is down and I literally can’t turn on my lights because someone decided a light switch needed an app.
For dark living rooms specifically, I think smart bulbs are worth it for your main ambient lighting, the overhead fixtures, or primary floor lamps. The ability to adjust brightness and warmth easily makes a real difference when you’re compensating for variable natural light. For task and accent lighting, regular bulbs are fine.
Creating Zones in Larger Spaces
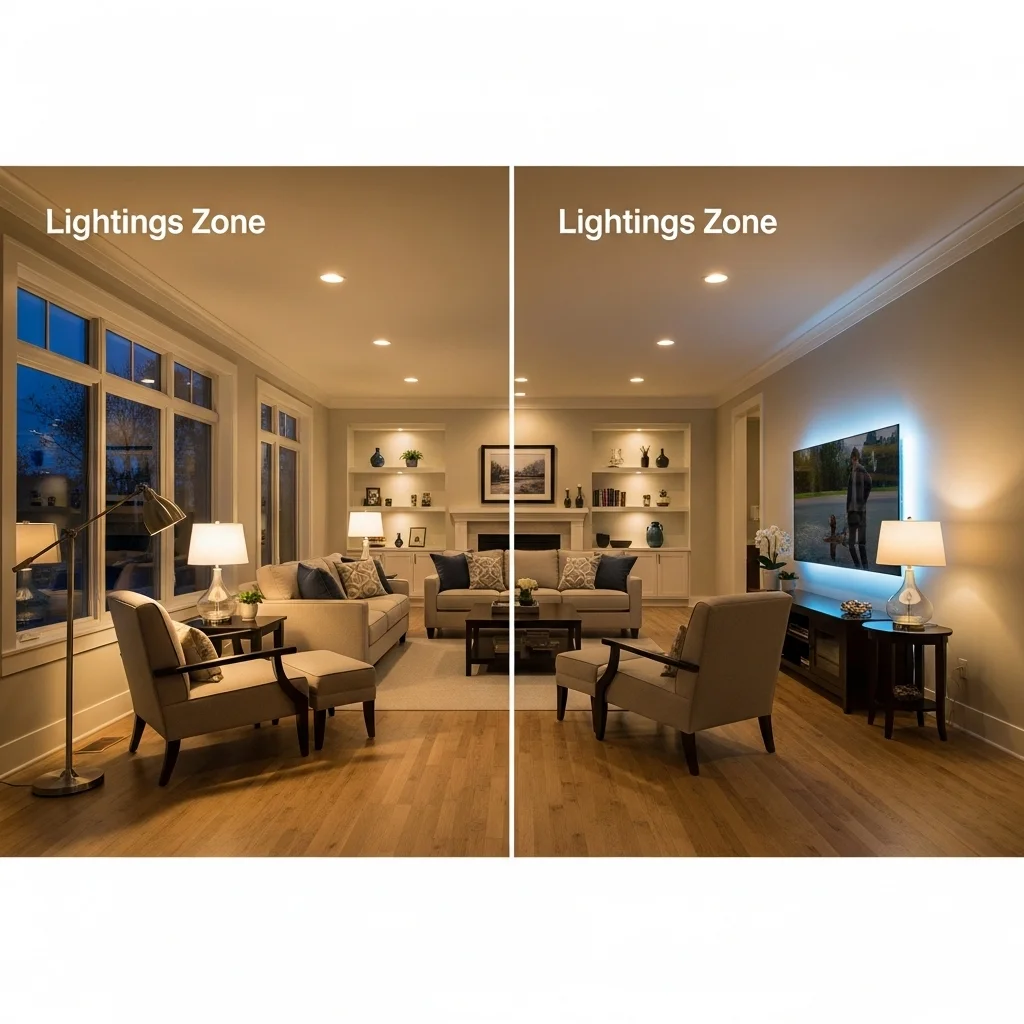
If your living room is sizable or serves multiple purposes, lighting zones make a huge difference. Rather than treating the entire space uniformly, create distinct areas with their own lighting character.
I’ve got a reading nook, a TV watching area, and a general conversation/gathering space in my living room. Each zone has its own lighting that can be controlled independently:
- Reading nook: Floor lamp with adjustable head plus a small table lamp
- TV area: Bias lighting behind the screen (reduces eye strain), plus a nearby table lamp for when we’re not watching
- Conversation area: Overhead recessed lights on a dimmer, accent lighting on shelves
Being able to light just the area you’re using rather than the entire room creates better atmosphere and actually saves energy. When I’m reading alone, I just light the nook. For guests, we bring up the whole room.
The Budget Question Everyone Asks
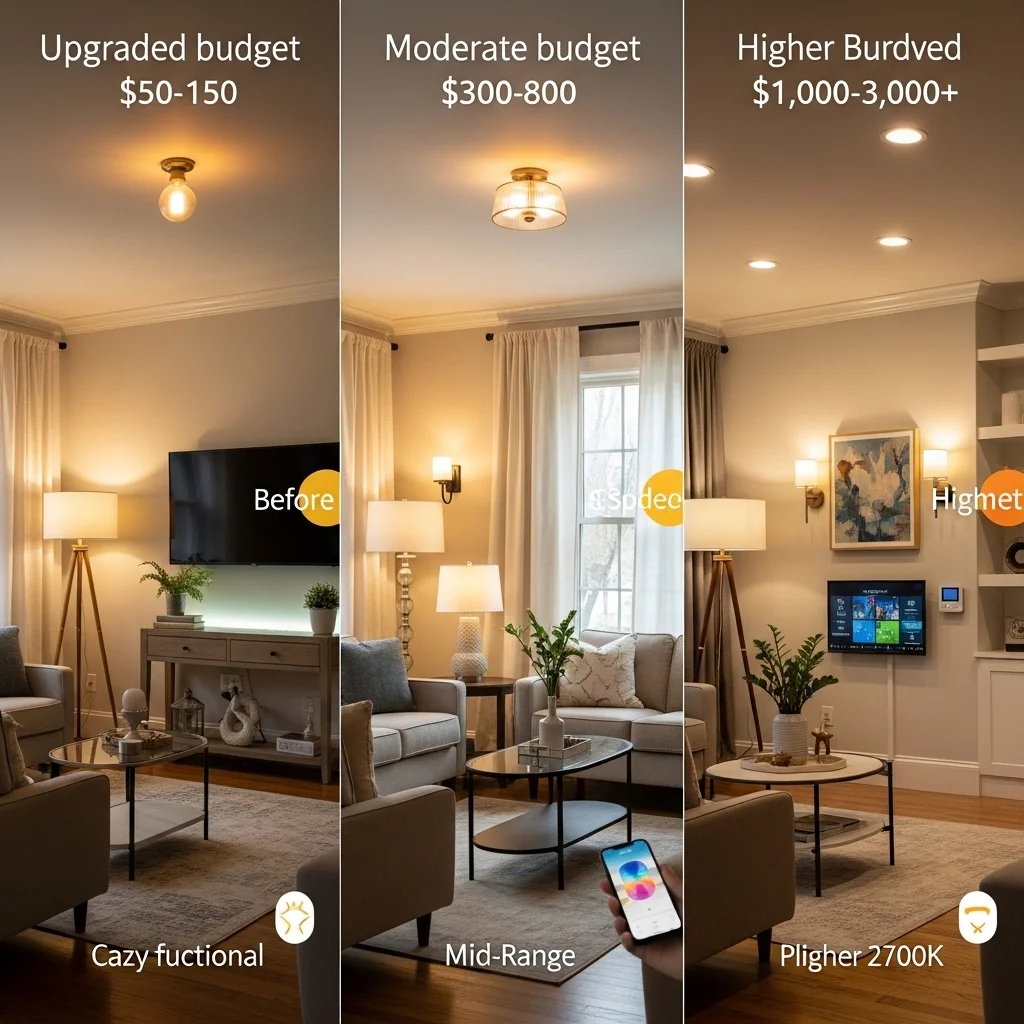
Lighting improvements can range from about $50 to several thousand dollars, depending on what you’re working with and how far you want to go.
Minimal budget (~$50-150): New LED bulbs in existing fixtures, one good floor lamp, possibly some battery-operated LED strip lights or puck lights. This can make a surprising difference if your current setup is just inadequate bulbs and insufficient light sources.
Moderate budget (~$300-800): Multiple table and floor lamps, some decorative fixtures, maybe one or two plug-in wall sconces, smart bulbs for primary fixtures, better quality window treatments. This is the sweet spot where you can really transform a space without major electrical work.
Higher budget (~$1,000-3,000+): Recessed lighting installation, hardwired wall sconces, designer fixtures, full smart home integration, potentially new windows or modifications. This is where you’re making permanent improvements that might add value to your home.
I’ve done transformations at every budget level, and honestly, you can get 70-80% of the way to ideal lighting without spending thousands. The key is being strategic about what changes will have the most impact for your specific situation.
When to Call an Electrician
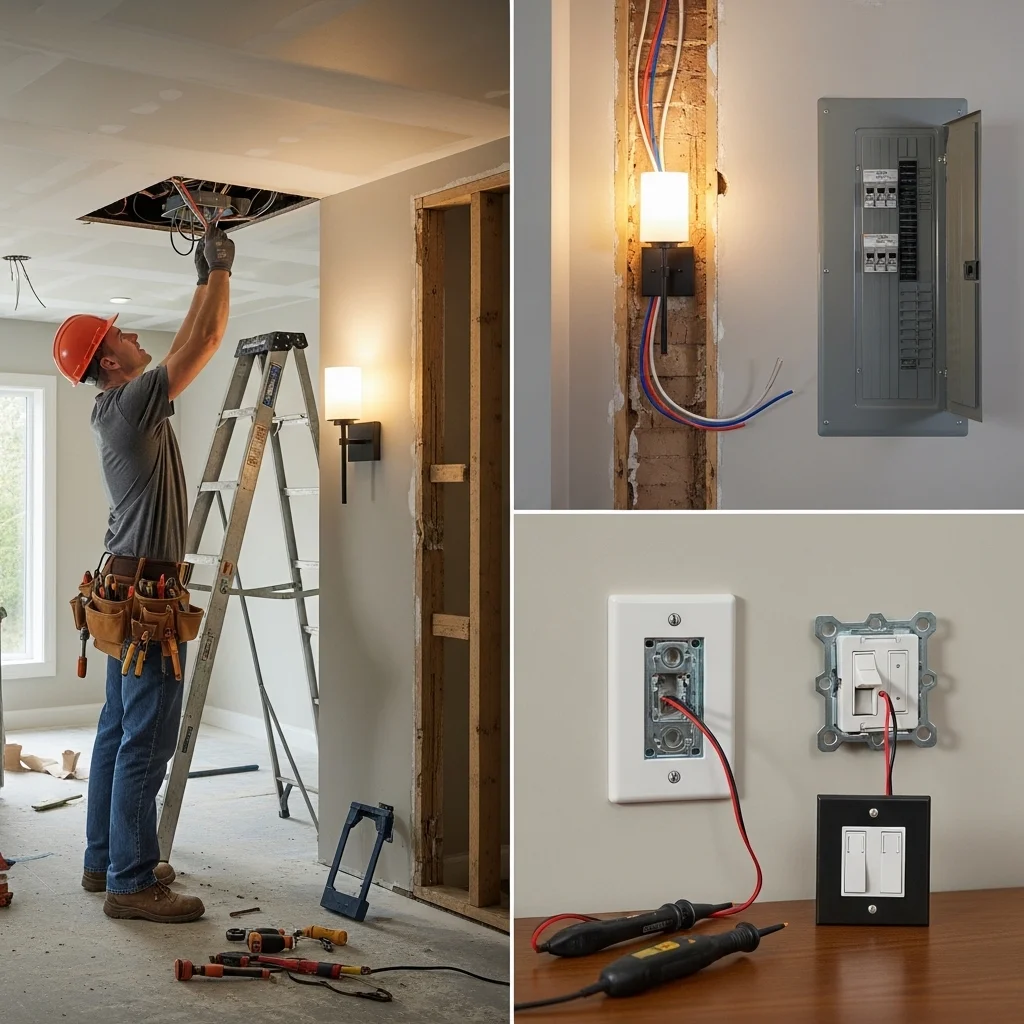
I’m reasonably handy and comfortable with basic electrical work (with the power off!), but some jobs really require a professional.
Adding new ceiling fixtures or recessed lights generally requires cutting into drywall, running new wire, and making sure everything’s up to code. Unless you’re experienced with electrical work, this is a job for a licensed electrician. Cost in my area runs $200-400 per fixture installed, depending on complexity.
Hardwired wall sconces require running wire through walls, installing junction boxes, and making sure the switch configuration works properly. I had an electrician install two swing-arm sconces, and it took him about three hours and cost $450 including materials.
Anything involving your electrical panel or adding new circuits should absolutely be done by a professional. No amount of improved lighting is worth burning your house down.
Replacing standard switches with dimmers is actually pretty straightforward if you’re comfortable working with electrical boxes. Turn off the power at the breaker, confirm it’s off with a tester, follow the instructions that come with the dimmer. I’ve done several of these myself without issue. But if you’re uncertain or uncomfortable, electricians will do it for $100-150 typically.
The Maintenance Nobody Talks About
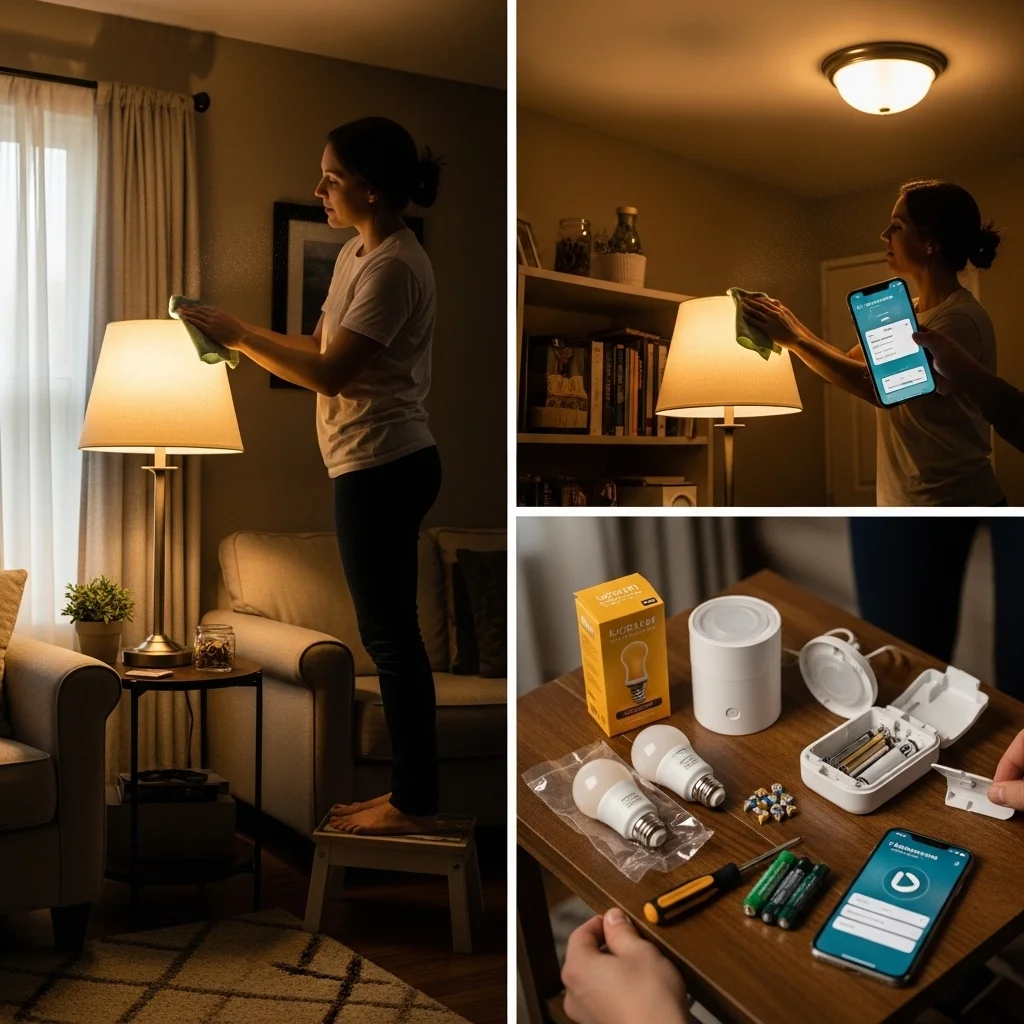
Once you’ve added all this lighting, there’s ongoing maintenance to consider. It’s not burdensome, but it exists.
Dust accumulates on bulbs and shades, reducing light output. I wipe down lampshades and bulbs a couple of times a year. It’s remarkable how much brighter things look after a simple dusting.
LED bulbs do eventually fail, despite their long lifespans. I keep a couple spare bulbs in my preferred color temperature on hand so I’m not making an emergency run to the store.
Batteries in remote controls and battery-operated fixtures need replacing. I’ve got a couple battery-powered puck lights that need new AAAs every 6-8 months or so.
Smart bulbs occasionally lose connectivity and need to be reset or reconnected to your network. It’s annoying but usually takes just a few minutes.
None of this is particularly time-consuming, but it’s worth knowing that adding more light fixtures means more things to maintain.
The Transformation Is Worth It
I’ve now lived in several homes and dealt with dark living rooms more times than I can count. Every single time, improving the lighting has been one of the most impactful changes I’ve made more noticeable than new furniture, more valuable than decorative accessories, more meaningful for daily quality of life.
Good lighting makes a room feel larger, more welcoming, and more functional. It reduces eye strain, improves mood, and makes every activity from reading to entertaining more pleasant. The difference between my first dim, poorly-lit apartment living room and my current well-lit space is genuinely night and day.
You don’t need to implement everything I’ve mentioned here. Start with what makes sense for your space, your budget, and your abilities. Maybe that’s just upgrading your bulbs and adding a floor lamp. Maybe it’s a full recessed lighting installation. Whatever you do, approach it systematically: layer your lighting, choose appropriate color temperatures, and position lights where they’ll actually be useful.
Your living room should be a space that works from morning coffee to late-night reading. With the right lighting strategy, even the darkest room can become exactly that.