When I bought my first house three years ago, the upstairs bathroom was a disaster. The previous owners had started a tile job, but they clearly never finished patches of adhesive, a few mismatched tiles clinging to the drywall, and an overall mess that made me want to close the door and pretend that room didn’t exist. I knew I needed to do something, but the thought of tiling an entire bathroom myself (or paying someone else to do it) made my wallet weep.
That’s when I started exploring what else was out there. Turns out, tiles aren’t the only game in town for bathroom walls, and depending on your situation, they might not even be the best option. Whether you’re working with a tight budget, facing a time crunch, or simply don’t love the look of traditional tile, there are plenty of alternatives that hold up surprisingly well in humid environments.
I’ve now renovated three bathrooms using non-tile approaches, helped friends with their projects, and made enough mistakes along the way to know what actually works versus what looks good on paper but fails in real life. Here’s what I’ve learned about creating beautiful, functional bathroom walls without reaching for a single tile.
Understanding the Moisture Challenge

Before we dive into specific solutions, let’s talk about why bathrooms are different from every other room in your house. The moisture issue is real, and ignoring it will cost you down the line. I learned this the hard way when I initially tried regular interior paint in a poorly ventilated half-bath. Within six months, I had mildew creeping along the corners and the paint was literally peeling off in sheets near the shower area.
Bathrooms deal with steam, splashing water, humidity fluctuations, and sometimes direct water contact, depending on the wall’s location. Any material you choose needs to either resist moisture, be easily cleanable, or be positioned strategically away from the wettest zones. This doesn’t mean you need commercial-grade waterproofing for every surface, but you do need to think carefully about what goes where.
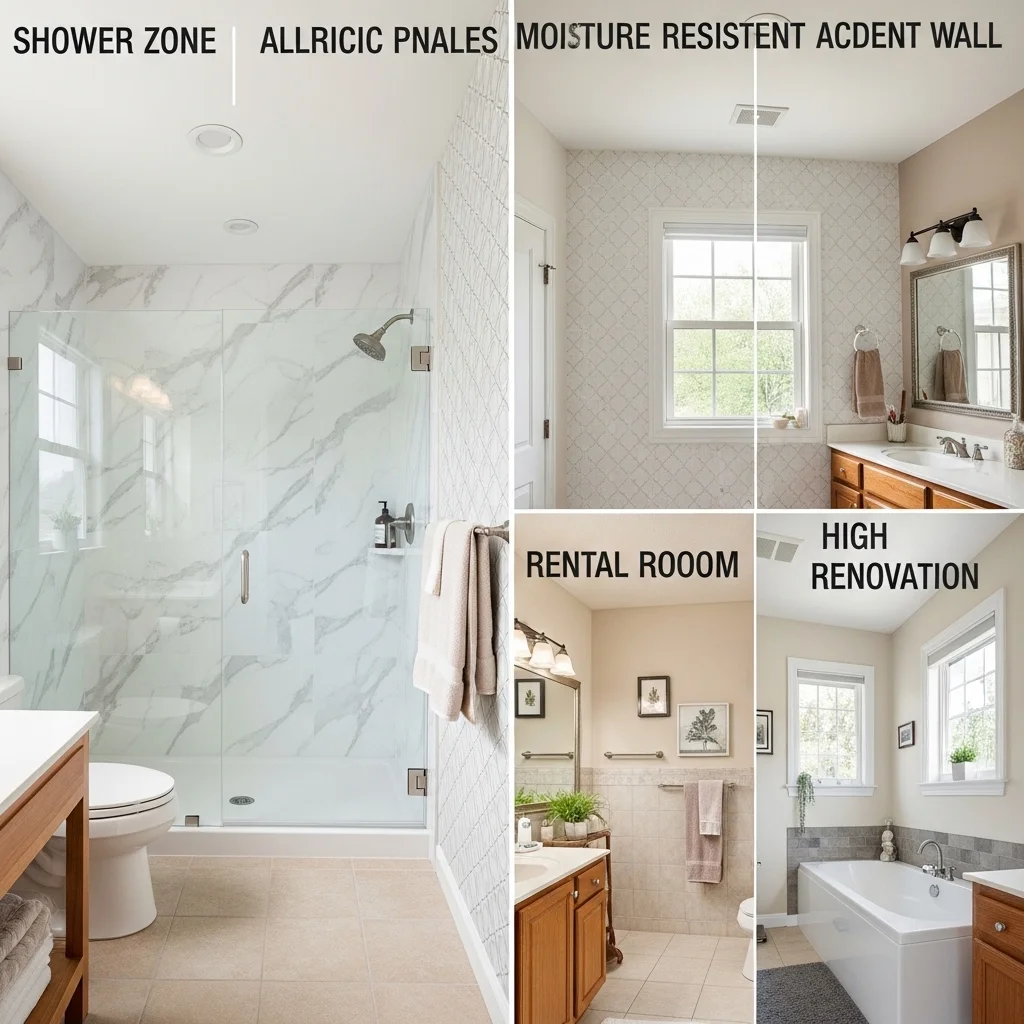
The area immediately around your tub or shower, what contractors call the “wet zone,” needs the most protection. Walls near the sink handle occasional splashes. The wall behind the toilet or across from the shower? Those can handle less robust materials since they mainly deal with ambient humidity rather than direct water exposure.
Waterproof Paint and Specialty Coatings
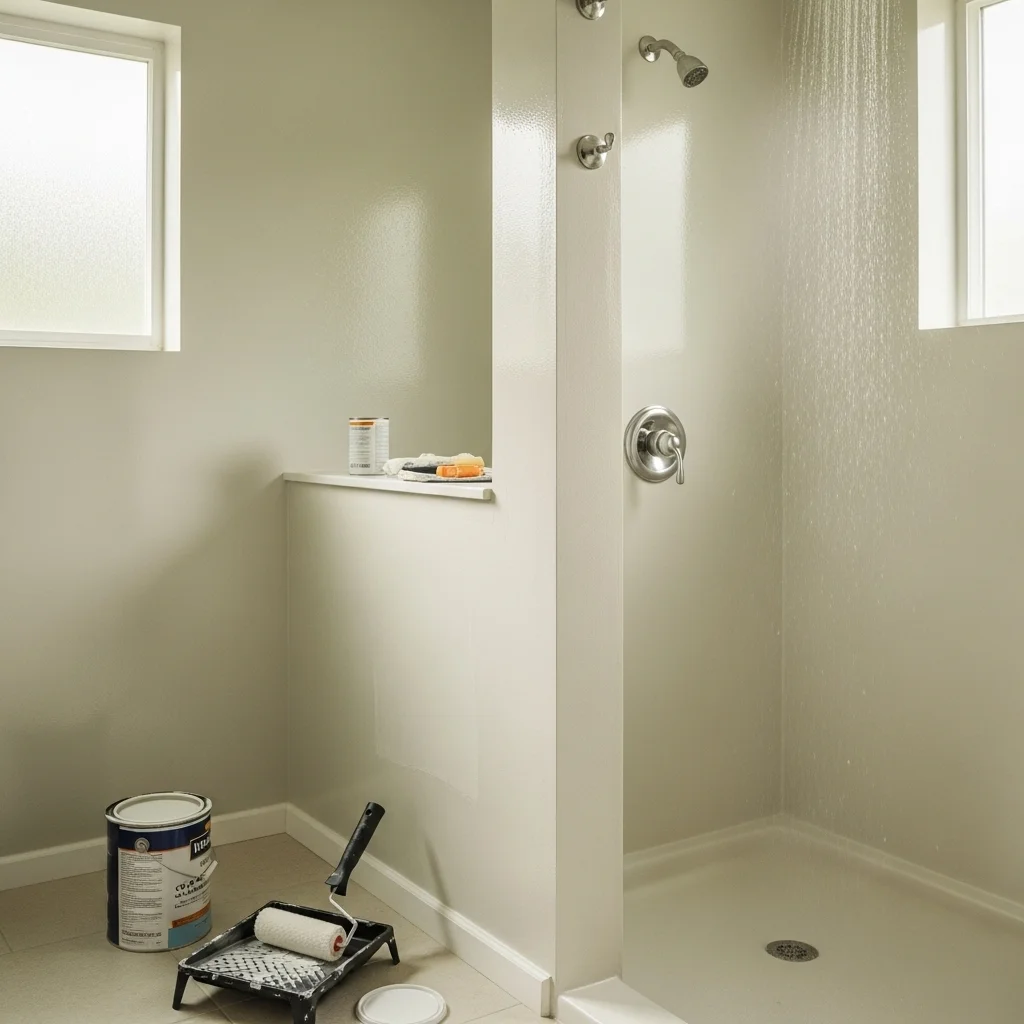
Let’s start with the simplest approach: paint. But not just any paint. I’m talking about bathroom-specific paints formulated to resist moisture and inhibit mold growth. These have come a long way in the past decade.
My go-to is a semi-gloss or satin finish bathroom paint from a quality brand. The slight sheen isn’t just aesthetic it creates a surface that water beads off rather than soaking into. I used Sherwin-Williams’ Emerald Bath & Spa paint in my powder room, and three years later, it still looks fresh despite that room having basically no ventilation. The mold and mildew resistance is built into the formula, which matters more than you might think.
For areas that get more direct moisture, there are specialty moisture-resistant paints and primers that create an even tougher barrier. I used Zinsser’s Watertite paint in a basement bathroom where dampness was a constant issue. It’s thicker than regular paint, almost rubbery when it dries, and it genuinely keeps moisture from penetrating the wall.
The color options with paint are obviously limitless, which is a huge advantage over tile. Want to change your mind in two years? You’re looking at a weekend project and a couple hundred dollars, not a full renovation. I’ve repainted my main bathroom twice now just because I got bored with the color try doing that with tile.
But paint has its limitations. It won’t hold up to direct shower spray, no matter what the label promises. I tried. The paint near the showerhead started looking dingy within weeks, and I ended up installing a small section of acrylic panels there anyway. For walls that don’t get directly wet, though, quality paint is honestly hard to beat for cost and versatility.
Bathroom Paneling and Beadboard
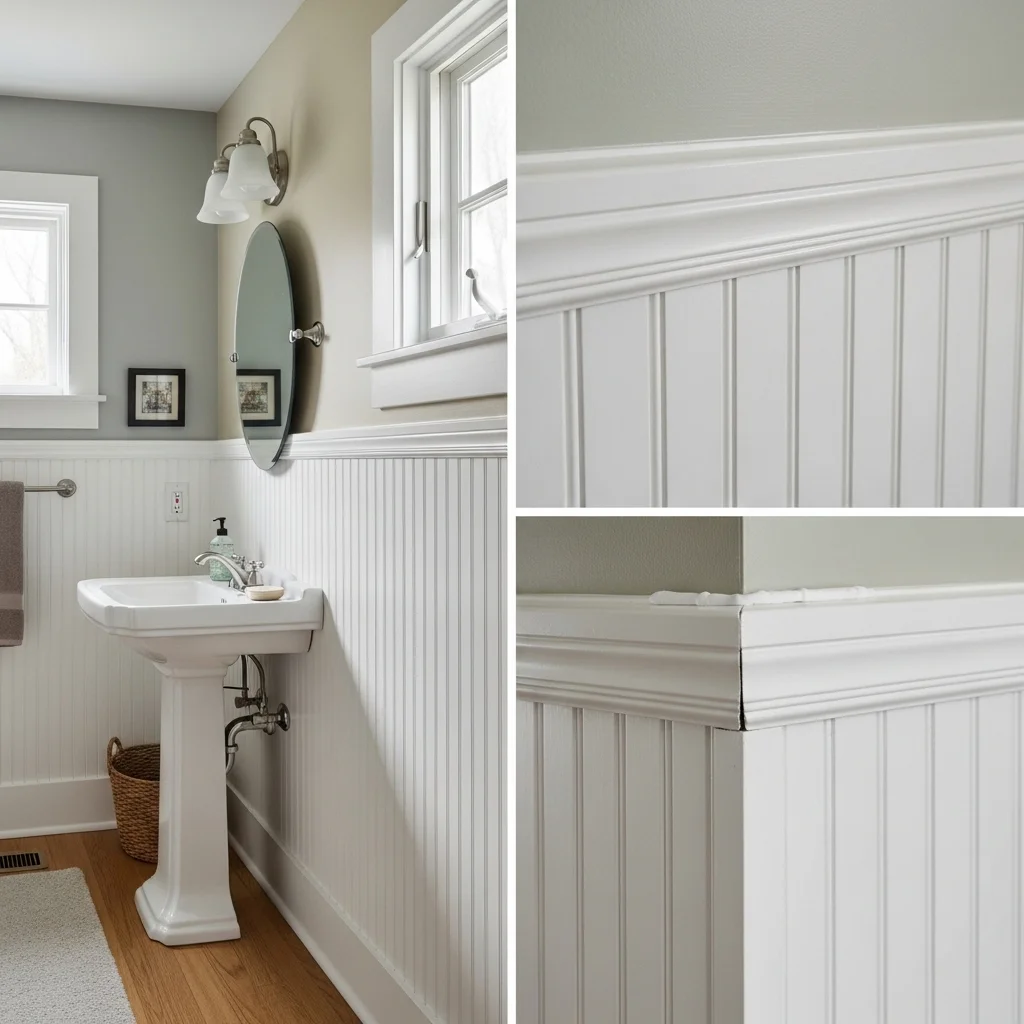
I have a soft spot for beadboard paneling in bathrooms. Maybe it’s because I grew up in New England where every old house has it, but there’s something classic and clean about it that just works.
Beadboard is that vertical groove paneling you’ve probably seen in cottage-style or farmhouse bathrooms, often painted white and running about three or four feet up the wall with paint or wallpaper above. The original stuff was solid wood tongue-and-groove boards, but modern options include MDF beadboard panels and PVC or vinyl versions specifically made for bathrooms.
I installed PVC beadboard in a rental property bathroom, and I’ll tell you it’s nearly indestructible. Water doesn’t faze it; you can clean it with anything, and installation was straightforward even for someone with moderate DIY skills. I used panels that came in 4×8 sheets, which covered the walls quickly. The material cost was around $40 per sheet, significantly less than decent tile would have been for the same coverage.
The traditional approach is painting wood or MDF beadboard, which looks beautiful but requires proper sealing and maintenance. I used MDF beadboard panels in my own powder room, sealed them with a good primer, and topped with two coats of semi-gloss paint. Five years later, it still looks great, though I wouldn’t use this approach in a full bath where it would see more moisture.
One thing to watch with beadboard: the seams and joints need to be properly caulked, or they become moisture traps. I learned this after noticing some slight discoloration along one seam where water had apparently been wicking in. A bead of bathroom caulk solved it, but it’s easier to do it right during installation.
Wallpaper Made a Comeback (and It’s Waterproof Now)
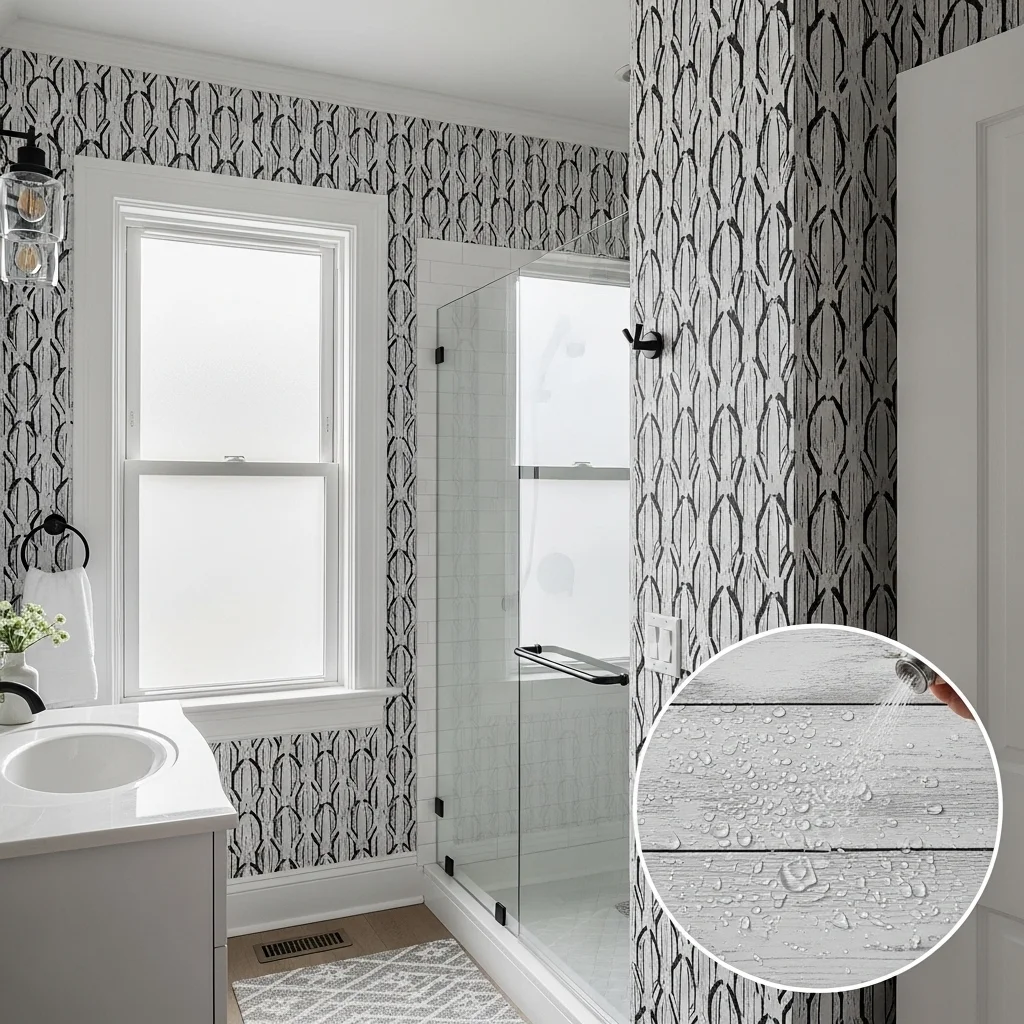
I was skeptical about bathroom wallpaper until my sister installed it in her renovated 1920s bathroom, and it genuinely looked incredible. Not the floral nightmare from 1987, we’re talking modern, sophisticated patterns with actual moisture resistance built in.
Vinyl wallpapers and specialty bathroom wallpapers now have waterproof or highly water-resistant properties. Some are even solid vinyl all the way through, meaning water can’t penetrate them at all. The installation process is similar to regular wallpaper, but you need to ensure the wall is properly prepped and sealed first.
My sister used a peel-and-stick vinyl wallpaper in a dramatic black-and-white pattern. It’s been up for two years in a bathroom that gets daily shower use, and it looks as crisp as the day she installed it. The key was positioning she used it on the walls that don’t get direct water contact, while the shower area has a glass enclosure and simple painted walls.
The variety of patterns available is staggering. You can get everything from subtle textures to bold geometrics, faux finishes that mimic expensive materials, or even photographic murals if that’s your thing. I recently saw a small bathroom with wallpaper that looked exactly like weathered wood planks from even a few feet away, you’d swear it was real shiplap.
Cost varies wildly depending on quality and where you buy it. I’ve seen peel-and-stick options at big box stores for $30-50 per roll, while designer vinyl wallpapers can run $100-300 per roll. Installation is DIY-friendly if you’re patient and careful, though getting seams perfect takes practice.
The main consideration is proper ventilation. Even waterproof wallpaper will eventually have issues if your bathroom is constantly steamy with no air circulation. I always recommend a good exhaust fan regardless of your wall treatment, but it’s especially important with wallpaper.
Acrylic and PVC Wall Panels
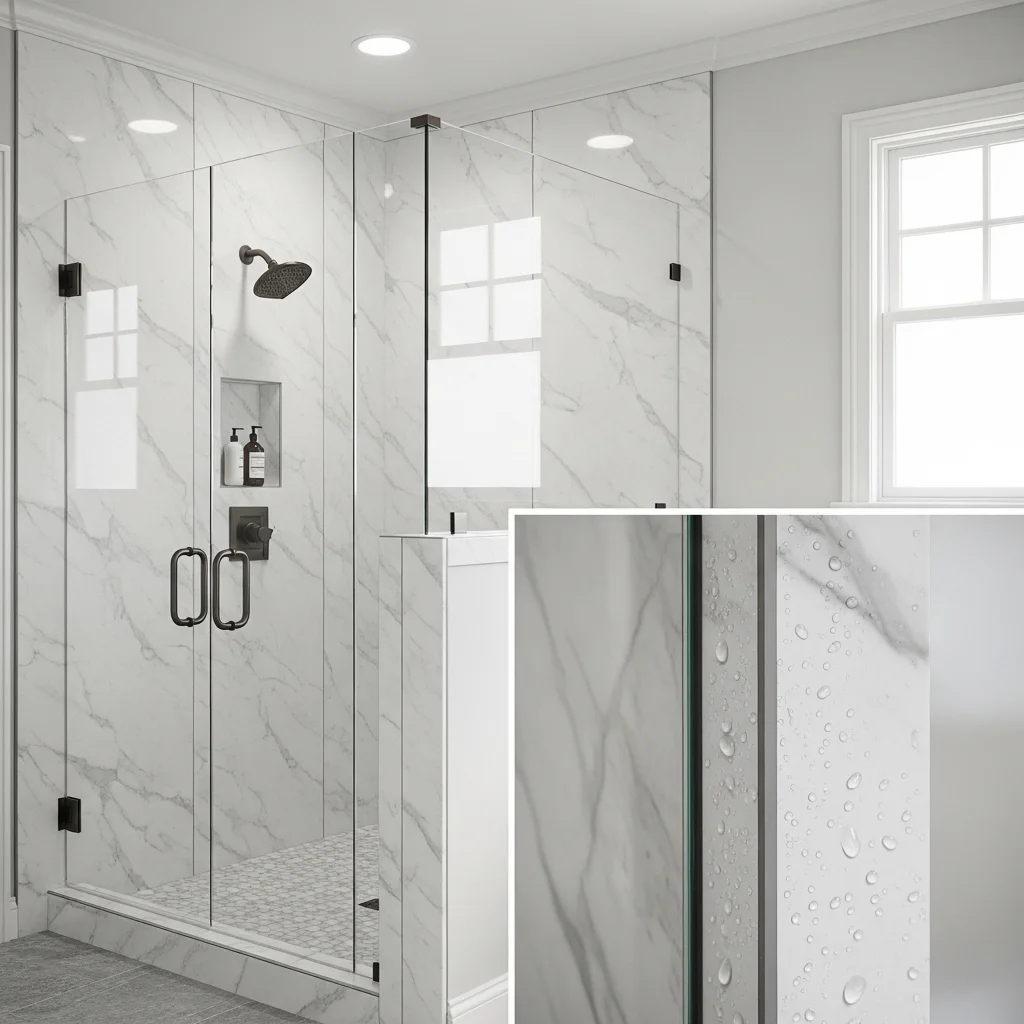
This is where things get interesting from a durability standpoint. Acrylic and PVC panels are basically the modern evolution of those terrible plastic shower surrounds from the 80s, except they actually look good now.
These panels are completely waterproof, easy to clean, and come in an impressive range of finishes. You can get them to look like marble, concrete, wood, tile pretty much any surface you can imagine. I used acrylic panels that mimicked Carrara marble in a shower remodel, and guests regularly ask what kind of stone it is. The panels cost about $400 for enough to cover a standard shower, compared to probably $1,500+ for actual marble tile and installation.
Installation varies depending on the product. Some systems use adhesive directly on drywall, others need furring strips, and some interlock together. I found the adhesive method easiest for a DIY project, though you need to ensure your walls are flat and smooth first. The panels I used were 1/4 inch thick and came in 4×8 foot sheets that I cut to size with a circular saw.
The seams are the critical part. Most systems use special trim pieces or caulking to create watertight joints. I spent extra time on this part, making sure everything was perfectly sealed, and it paid off. Three years later, zero leaks or water damage.
One downside is that if you ever do damage a panel, say, you drop something heavy and crack it, you typically need to replace the entire panel rather than just patching a small area like you might with tile. However, in my experience, they’re actually pretty tough. I’ve had kids banging toys around in there, and the acrylic has held up fine.
These panels work great for full wall coverage in showers or tub surrounds, but some people find them too plastic-looking for an entire bathroom. Mixing them with other materials often works better aesthetically panels in the wet areas, paint or wallpaper elsewhere.
Concrete and Plaster Finishes
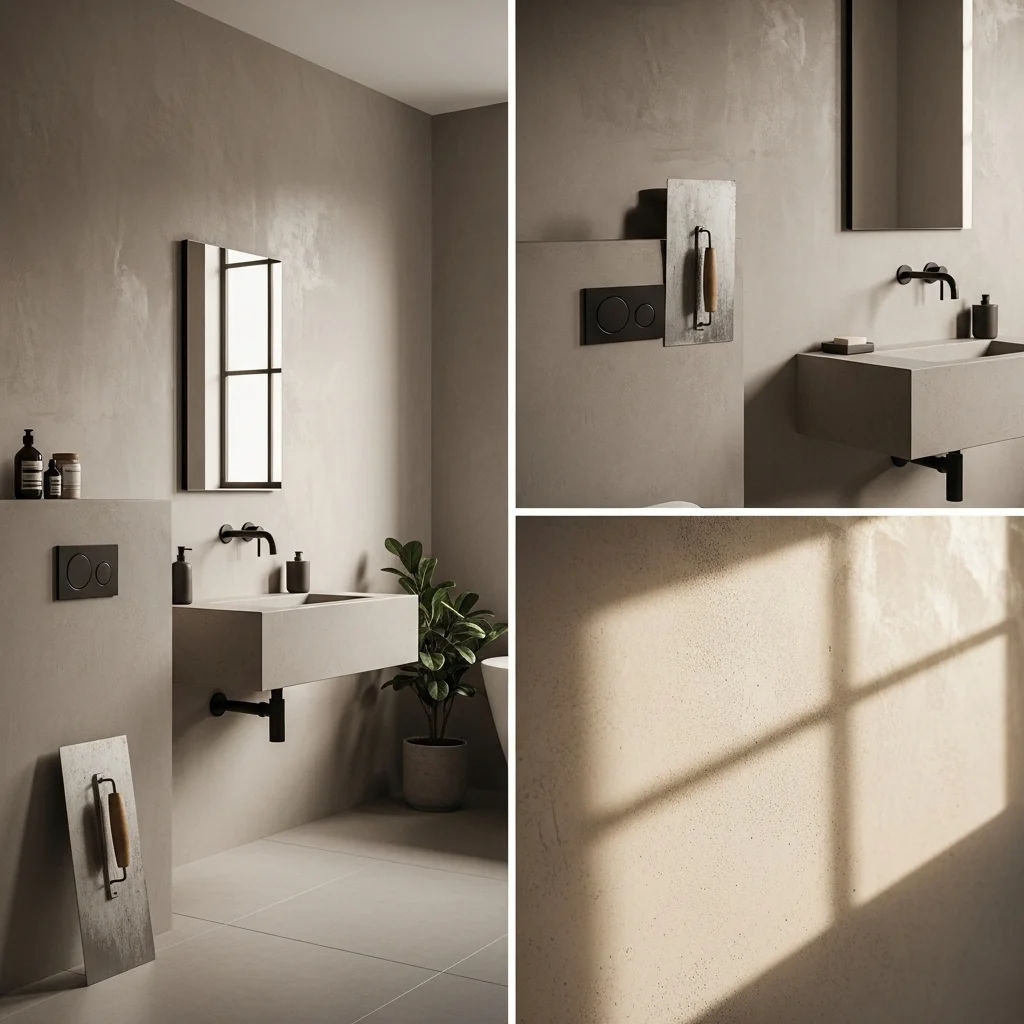
This is getting into more specialized territory, but if you want something truly unique, decorative concrete or polished plaster finishes can look absolutely stunning in bathrooms.
I hired a professional for this one because the application technique requires real skill, but I watched the whole process when we did a concrete-look finish in a modern basement bathroom. The installer used a trowel-applied coating system that created the appearance of smooth concrete with subtle variations in tone. Multiple thin layers built up depth and character, then the whole thing was sealed with a waterproof topcoat.
The result was unlike anything you’d get with tile or paint a seamless, almost industrial-luxe look that worked perfectly with the modern fixtures we’d chosen. The cost was higher than paint but competitive with mid-range tile installation, and the labor took about three days for a small bathroom.
Polished plaster techniques like Venetian plaster or tadelakt create similarly seamless walls with a different aesthetic slightly more Mediterranean or European feeling. These finishes have been used in bathrooms for centuries in some parts of the world, so their durability is well-proven when applied correctly.
The catch is that both concrete and plaster finishes absolutely require proper sealing, especially in wet areas. The sealant needs reapplication every few years to maintain water resistance. This ongoing maintenance is more involved than tile or panels, but for some people, the unique look is worth it.
These finishes also show wear and patina over time, which some people love, and others hate. Water spots, minor staining, and subtle changes in appearance are part of the character. If you want something that looks identical ten years from now, this probably isn’t your best bet.
Natural Wood (When Used Strategically)
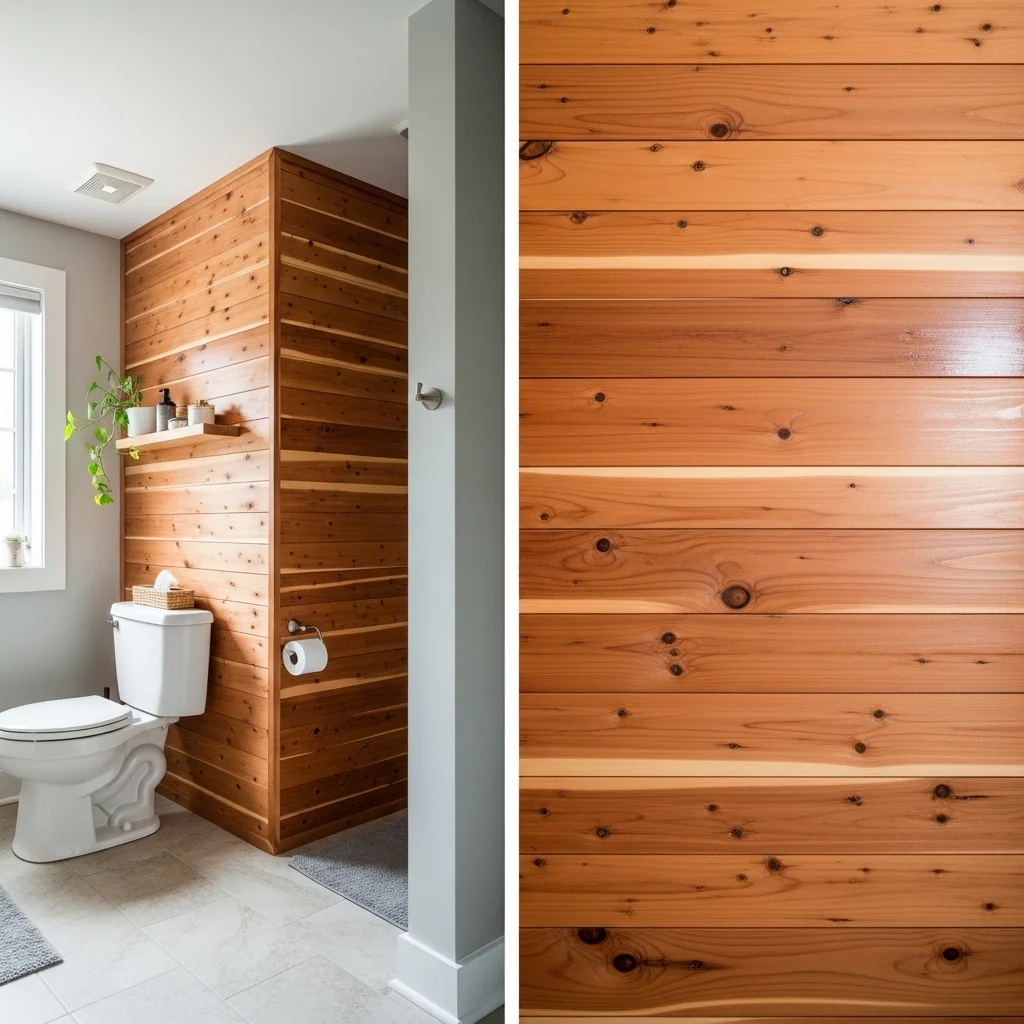
Using real wood in bathrooms makes some people nervous, but it can work beautifully if you choose the right wood, seal it properly, and place it strategically.
I used cedar planks on one accent wall in a bathroom renovation, specifically the wall behind the toilet where moisture exposure is minimal. Cedar naturally resists rot and moisture damage better than most woods, plus it smells amazing. I sealed it with three coats of marine-grade spar urethane, which is formulated for boats if it can handle ocean spray, it can handle bathroom humidity.
Other good options include teak, which is naturally water-resistant and commonly used in shower benches and bath mats, or pressure-treated lumber if you’re going for a rustic look (though the chemicals in treated wood aren’t everyone’s preference for indoor use).
The key is keeping wood away from direct water contact and ensuring excellent ventilation. Even sealed wood will eventually have issues if it’s constantly wet. I’ve seen beautiful ship-lap walls, reclaimed barn wood accents, and even live-edge shelving that all held up well in bathrooms, but always on walls away from the shower or tub.
Cost depends entirely on the wood you choose. I’ve done projects with inexpensive pine boards that looked great once stained and sealed (total material cost under $100), and I’ve seen high-end bathrooms with exotic wood that probably cost more than my first car.
The installation process is similar to any wood wall paneling project. You need a solid backing to attach to, proper spacing for any expansion or contraction, and careful finishing at corners and edges. It’s a solid intermediate DIY project if you have basic carpentry skills.
Brick and Exposed Masonry
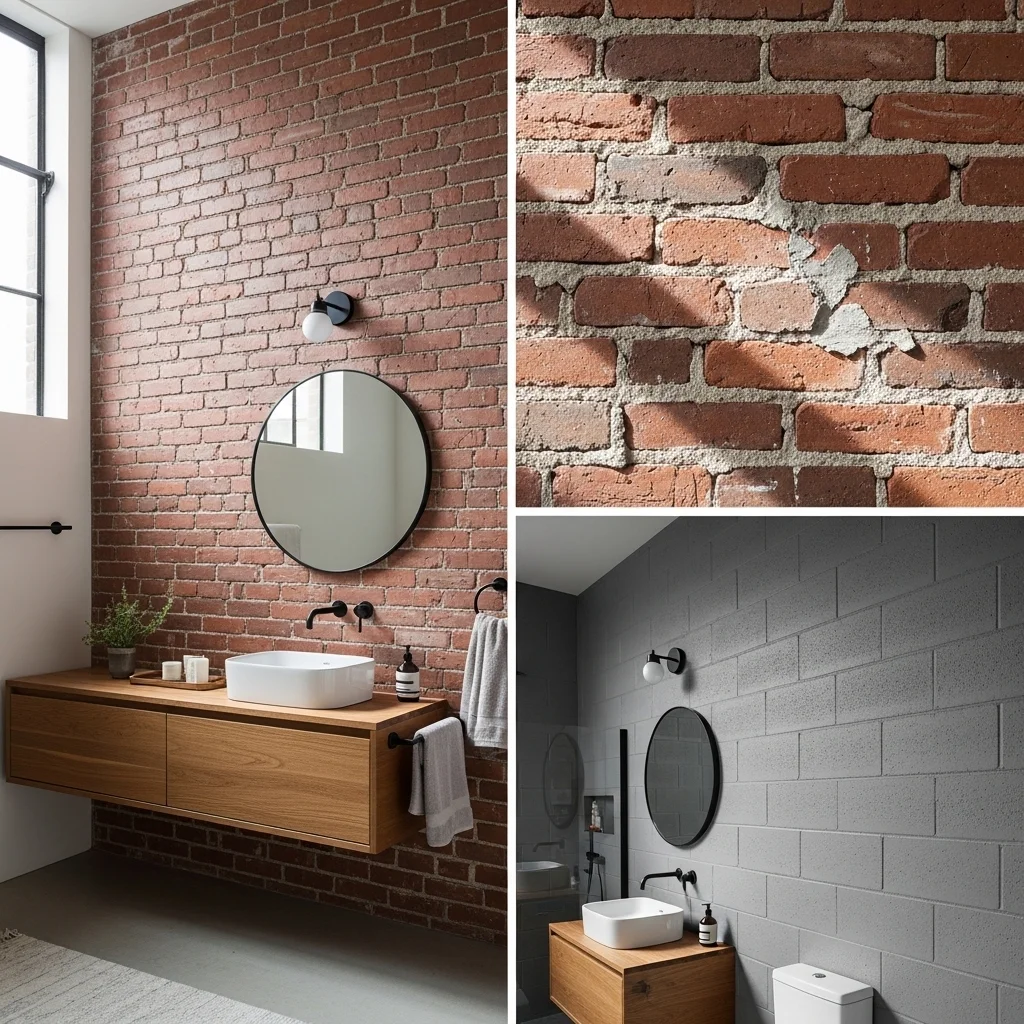
If you’re working with an older building that has brick or block walls underneath whatever’s currently covering them, exposing and sealing that masonry can create incredible character.
I helped a friend expose the brick in her loft bathroom during a renovation. We stripped off the old plaster, cleaned the brick thoroughly, repaired a few damaged spots with fresh mortar, and then sealed everything with a penetrating masonry sealer followed by a breathable waterproofing coating. The texture and warmth that brick brought to the space completely transformed it.
The process isn’t for the faint of heart. Demo is messy, you might find issues behind the existing walls that need addressing, and properly sealing brick for bathroom use takes time and the right products. But if you have good brick hiding back there, the material cost is essentially zero and the look is something you can’t really replicate with any other approach.
Painted brick is another option if the natural brick color doesn’t work with your design. We painted brick in a different bathroom using masonry paint, which lets the texture shine through while giving more control over color. The key is using paint that’s flexible enough to move with the brick as it expands and contracts with temperature and humidity changes.
Concrete block can also work if your goal is an industrial or minimalist aesthetic. I’ve seen this in commercial spaces more often than homes, but it can be striking when done well. Sealed, smooth concrete block in a monochromatic bathroom has a kind of brutalist beauty if that’s your style.
Glass Blocks and Panels
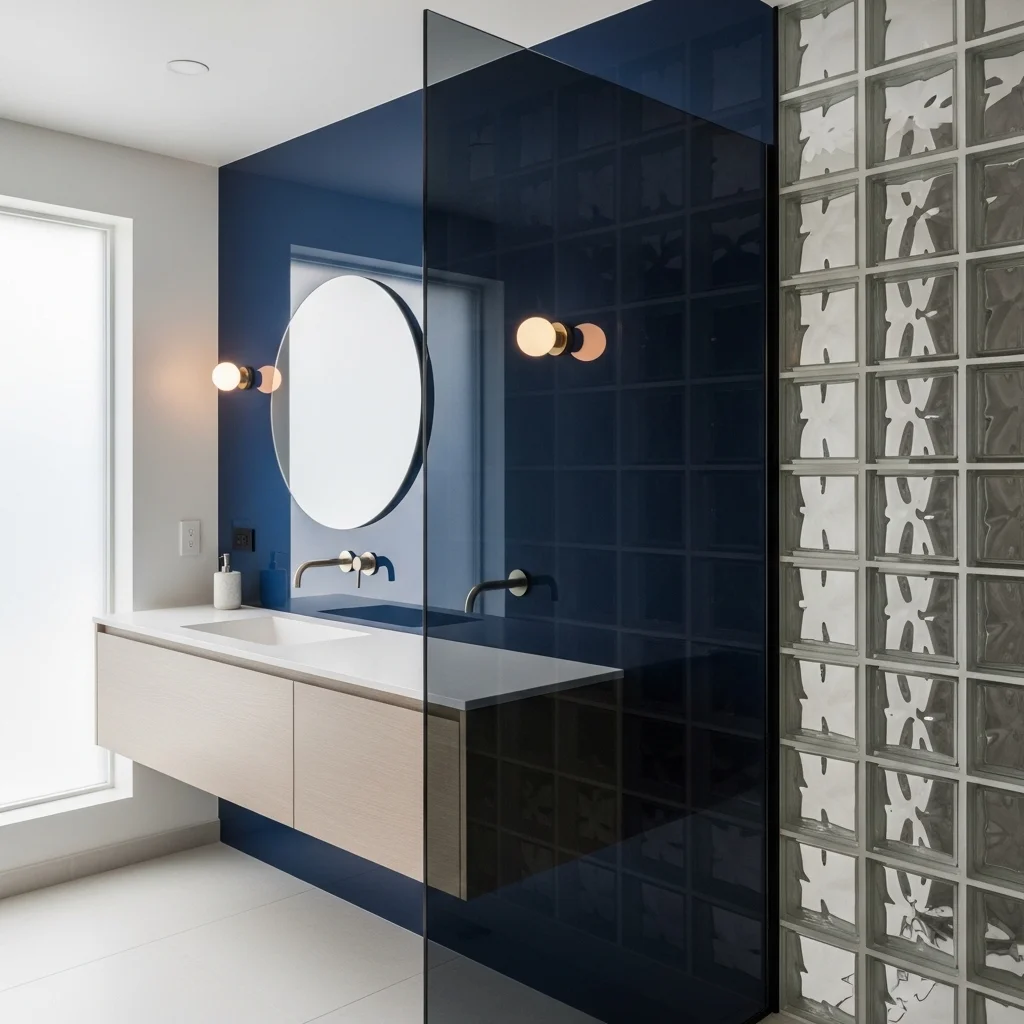
Glass block had its moment in the 80s and 90s, fell out of favor for a while, and is now making a comeback with more modern applications. I’m not talking about full walls of cloudy glass blocks, though those can still work in the right context; rather, it’s the strategic use of glass as an accent or functional element.
I used a panel of back-painted glass in a small bathroom remodel last year. It’s exactly what it sounds like: a sheet of tempered glass painted on the back side, then installed against the wall. The effect is this incredibly smooth, glossy, and completely waterproof surface with intense color. We did deep navy blue behind the vanity, and it becomes a focal point every time someone walks in.
The installation requires professional help unless you’re very experienced. Tempered glass is heavy and unforgiving if you mess up. The cost was about $500 for a 4×6 foot panel, custom-made to size, which included the painting and tempering. Installation added another $200. Not cheap, but for a high-impact accent wall, it created a look you simply can’t get any other way.
Glass blocks can work well for shower enclosures or privacy walls, providing light transmission while obscuring views. The installation is labor-intensive but doable as a DIY project if you’re methodical. I’ve seen modern takes using larger, clearer glass blocks that look much more contemporary than the chunky frosted blocks from decades past.
Fabric Panels and Upholstered Walls
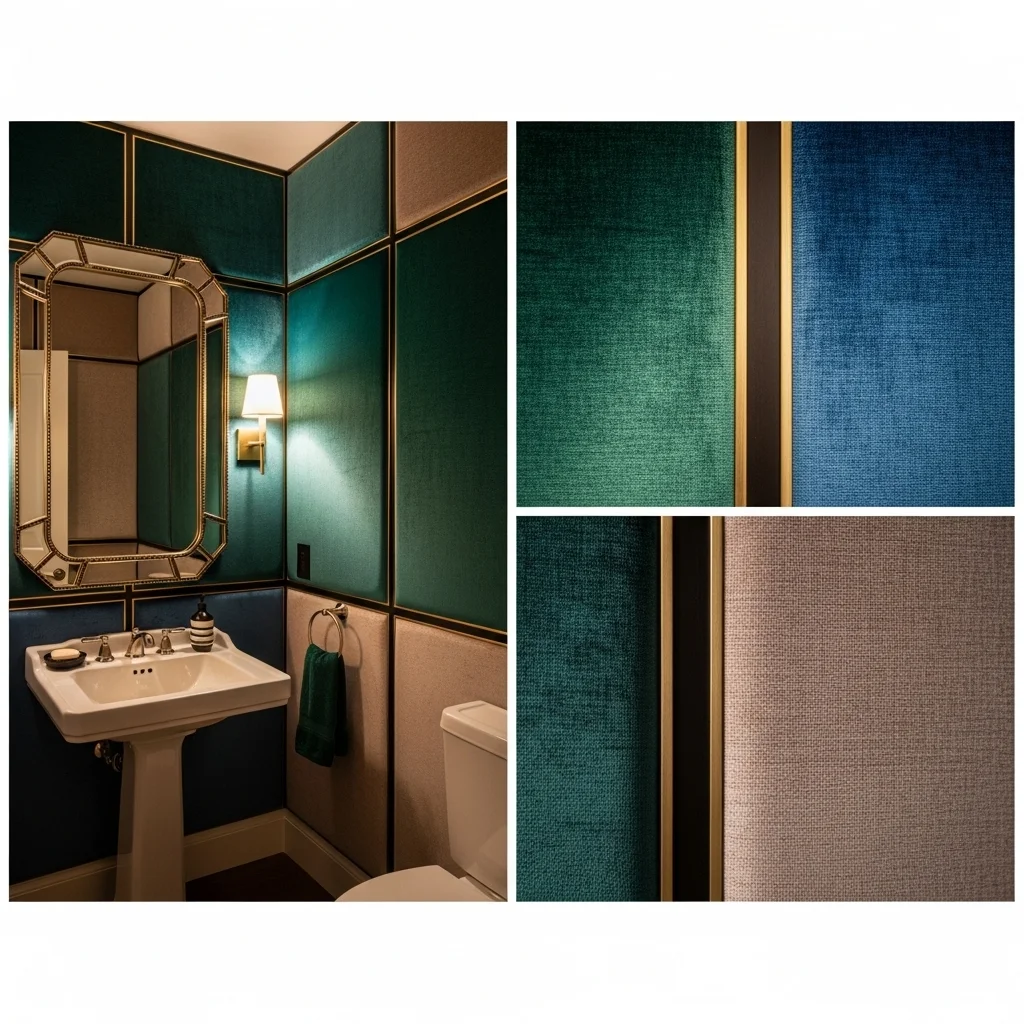
This might sound crazy for a bathroom, but hear me out. Fabric wall panels can work in bathrooms if they’re properly treated for moisture resistance and positioned away from direct water contact.
I saw this done in a powder room at a designer showhouse, and it was genuinely beautiful upholstered panels in a water-resistant outdoor fabric created this soft, luxurious feeling you don’t usually get in bathrooms. The panels were backed with waterproof material and treated with a fabric protector spray.
This is definitely for bathrooms that don’t have showers or tubs powder rooms, primarily. The maintenance involves occasional cleaning with appropriate fabric care products and potentially retreating with water-resistant spray every year or two.
From a cost perspective, it’s all over the map depending on whether you DIY or hire professionals and what fabrics you choose. Outdoor fabrics designed for marine use or patio furniture are your best bet for moisture resistance. I’ve seen people use everything from performance velvet to waterproof canvas.
The acoustic properties are a nice bonus fabric absorbs sound, so bathrooms with fabric elements feel quieter and more intimate than hard-surface spaces. This probably matters more in commercial settings than homes, but it’s a noticeable difference.
Bringing It All Together: What Actually Works
After working on multiple bathrooms and seeing these different approaches in action over time, here’s my honest take on what works best in different scenarios.
For full bathrooms with showers: Combine approaches based on zones. Use acrylic or PVC panels in the shower itself, waterproof paint or moisture-resistant wallpaper on other walls. This gives you maximum protection where needed while keeping costs reasonable and aesthetics flexible.
For powder rooms: Nearly anything goes since moisture isn’t a major concern. I’d lean toward wallpaper or decorative paint finishes since you can be more adventurous without worrying about durability as much.
For tight budgets: Quality bathroom paint is your friend. Properly applied in multiple coats, it’ll last years and costs a fraction of any other option. Add visual interest with color, stencils, or painter’s tape designs rather than expensive materials.
For rental properties: PVC or vinyl materials that can handle abuse and be cleaned easily. I’ve seen too many rental bathrooms destroyed by tenants to recommend anything precious. Waterproof, scrubbable, and inexpensive to replace wins every time.
For high-end renovations: Consider the specialized finishes polished plaster, back-painted glass, custom wood treatments. These create unique spaces that stand out and potentially add real value to your home.
The biggest mistake I see people make is choosing materials based purely on aesthetics without considering their specific bathroom’s conditions. A poorly ventilated bathroom needs different materials than one with a great exhaust fan and a window. A family bathroom with kids needs different durability than an adult’s ensuite.
The Ventilation Factor Nobody Talks About Enough
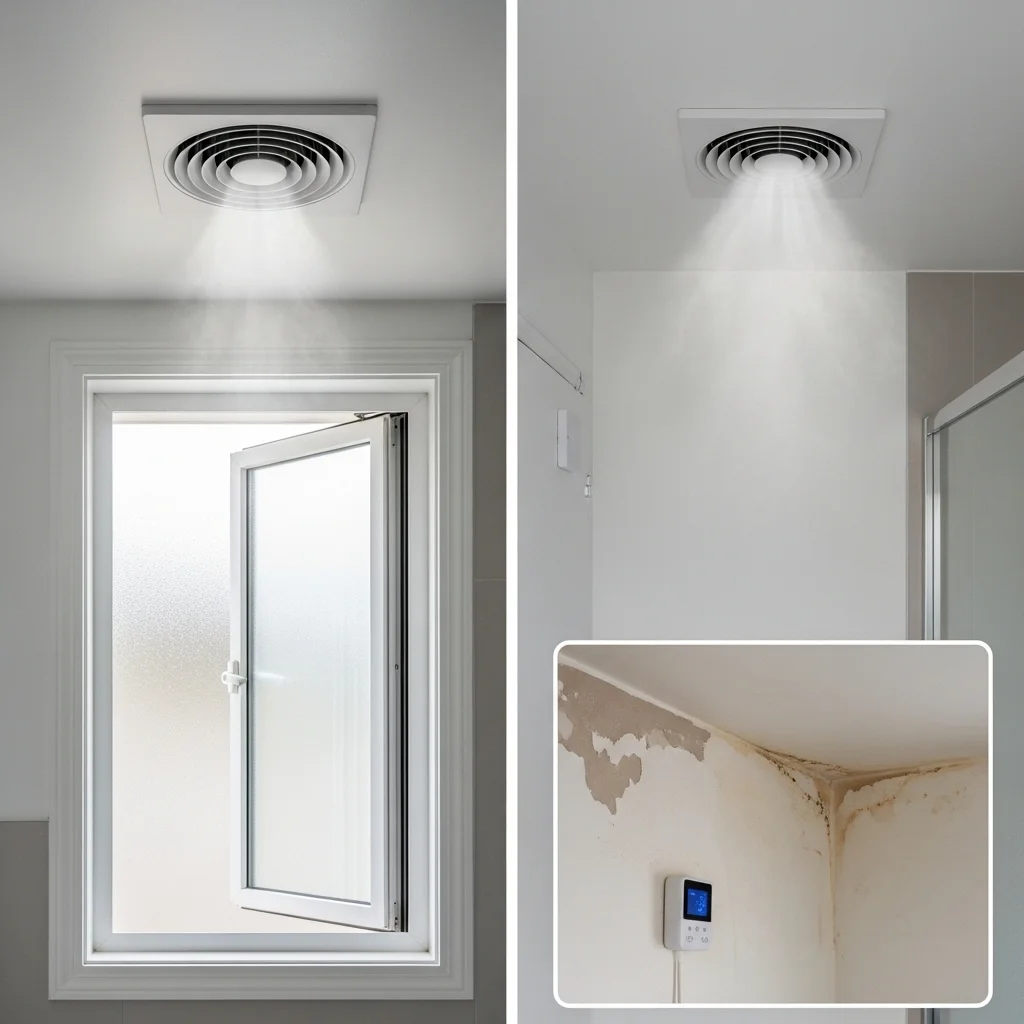
I mentioned this briefly earlier, but it deserves its own section because it’s that important: your ventilation setup matters more than almost any material choice you make.
The best wall treatment in the world will eventually have problems in a bathroom that stays humid for hours after every shower. Conversely, even mediocre materials can last surprisingly long in a well-ventilated space. I learned this after wondering why the paint in my upstairs bathroom lasted twice as long as the same paint in a nearly identical downstairs bathroom the upstairs had a better exhaust fan and a window we actually opened.
If your exhaust fan sounds like a jet engine, you probably don’t run it enough or long enough. Modern fans are quiet and efficient. I replaced an old loud fan with a Panasonic WhisperCeiling fan that’s so quiet you can barely tell it’s running, and I actually use it now. It has a humidity sensor that runs automatically when needed, which solved the problem of me forgetting to turn it on.
Opening windows helps tremendously when the weather permits. I crack the window in my bathroom even in winter if I’ve just showered, just for a few minutes to let the steam escape. This simple habit has eliminated the mildew issues I used to see in corners and along the ceiling edge.
Consider this: spending $150 on a good bathroom fan might extend the life of your wall treatment by years and prevent expensive mold remediation down the line. It’s one of the best investments you can make in bathroom longevity, regardless of whether you use tile, paint, or anything else.
Making the Decision: Where to Start
If you’re standing in your bathroom right now trying to figure out what direction to go, here’s how I’d approach it:
First, assess your moisture situation honestly. Is this a full bathroom that sees daily showers? A powder room that’s basically just toilet and sink? How’s your ventilation? Be realistic about how wet things actually get.
Second, consider your skill level and available time. Some of these approaches are genuine DIY projects; others really benefit from professional installation. I’m reasonably handy and I’ve still hired out certain projects when I knew they were beyond my skill level or patience.
Third, think about longevity and maintenance. Are you someone who likes changing things up every few years, or do you want to set it and forget it for a decade? Some materials make future changes easy, others lock you in.
Fourth, look at your budget realistically. Materials are only part of the cost factor in tools, prep work, potential mistakes, and your own time. Sometimes paying more upfront for professional installation saves money in the long run compared to a DIY disaster you have to redo.
I typically tell people to start small if they’re unsure. Do one wall as a test case. Try a new material in a powder room before committing to your main bathroom. Learn what you like living with before making permanent decisions throughout your home.
The beauty of most non-tile options is that they’re relatively easy to change or update compared to tile work. You can repaint, replace panels, or strip wallpaper without the massive undertaking of tile removal. This flexibility is actually one of the biggest advantages these approaches have over traditional tile.
Your bathroom walls don’t need tiles to be beautiful, durable, and functional. They just need the right material for your specific situation, properly installed and maintained. Whether that’s a fresh coat of quality paint, dramatic wallpaper, waterproof panels, or something more unusual, there’s almost certainly a non-tile option that’ll work perfectly for your space.