There’s something deeply satisfying about looking at your walls and seeing something you made with your own hands rather than something mass-produced from a big-box store. I started getting into DIY wall decor about five years ago, mostly out of necessity, my rental apartment had boring beige walls that desperately needed personality, and my budget was laughably small.
What began as a weekend project with some thrifted frames has turned into a genuine hobby. I’ve made mistakes (so many mistakes), wasted money on supplies that didn’t work out, and learned which projects look impressive but are actually surprisingly simple. I’ve also discovered which “easy” Pinterest projects are actually nightmares in disguise.
If you’re staring at blank walls right now, wondering how to make your space feel more like you without spending a fortune or needing advanced artistic skills, these are the ten projects that have worked best for me. Some took an afternoon. Others evolved over months. All of them made a real difference in how my home feels.
1. The Curated Gallery Wall (Not As Scary As It Looks)
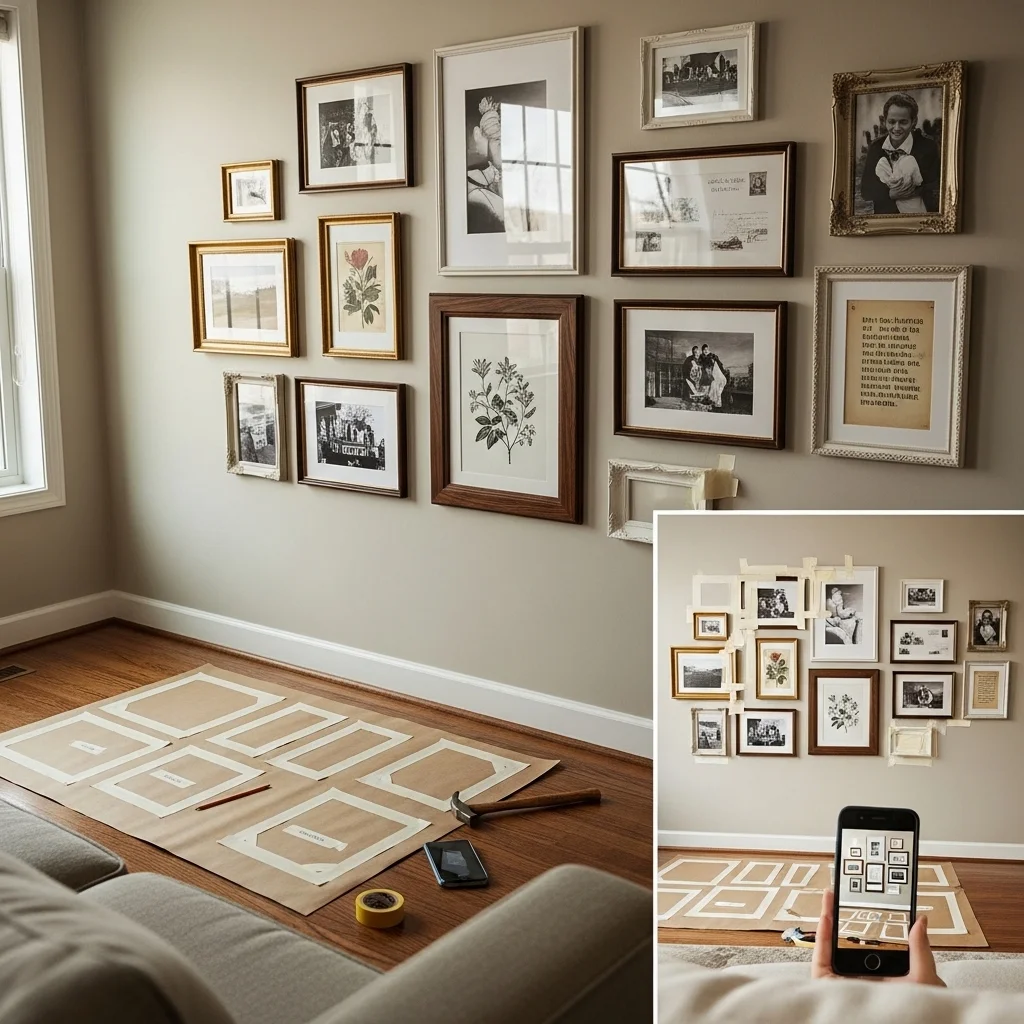
I’ll start with this one because it’s probably had the biggest impact in my home, and it’s way more forgiving than people think. The keyword here is “curated.” This isn’t just slapping up a bunch of frames in a grid. It’s mixing frame styles, sizes, and contents to create something that feels collected over time.
My first gallery wall attempt was in my living room, spanning about 6 feet of wall space next to the sofa. I collected frames over about two months from thrift stores, estate sales, and even my parents’ basement. The total investment was maybe $60 for twelve frames ranging from 4×6 inches to 16×20 inches.
Here’s what I wish someone had told me at the start: lay everything out on the floor first. Seriously. I tried to wing it on the wall and ended up with seventeen nail holes that I had to spackle over. Take a photo of your floor arrangement, then recreate it on the wall.
For content, I mixed family photos with art prints I downloaded and printed at Staples (about $3-8 per print depending on size), pages from vintage books I found at a used bookstore, and even a few postcards. The variety is what makes it interesting.
The technique that saved me: I traced each frame on kraft paper, cut out the shapes, and taped them to the wall with painter’s tape. This let me move things around until the composition felt right, then I just hammered the nail through the paper template and removed it. No measuring required, and everything ended up exactly where I wanted it.
The whole project took an afternoon once I had all my materials, and I genuinely get compliments on it every time someone visits. If you’re nervous about commitment, start with 3-5 frames and expand over time as you find pieces you love.
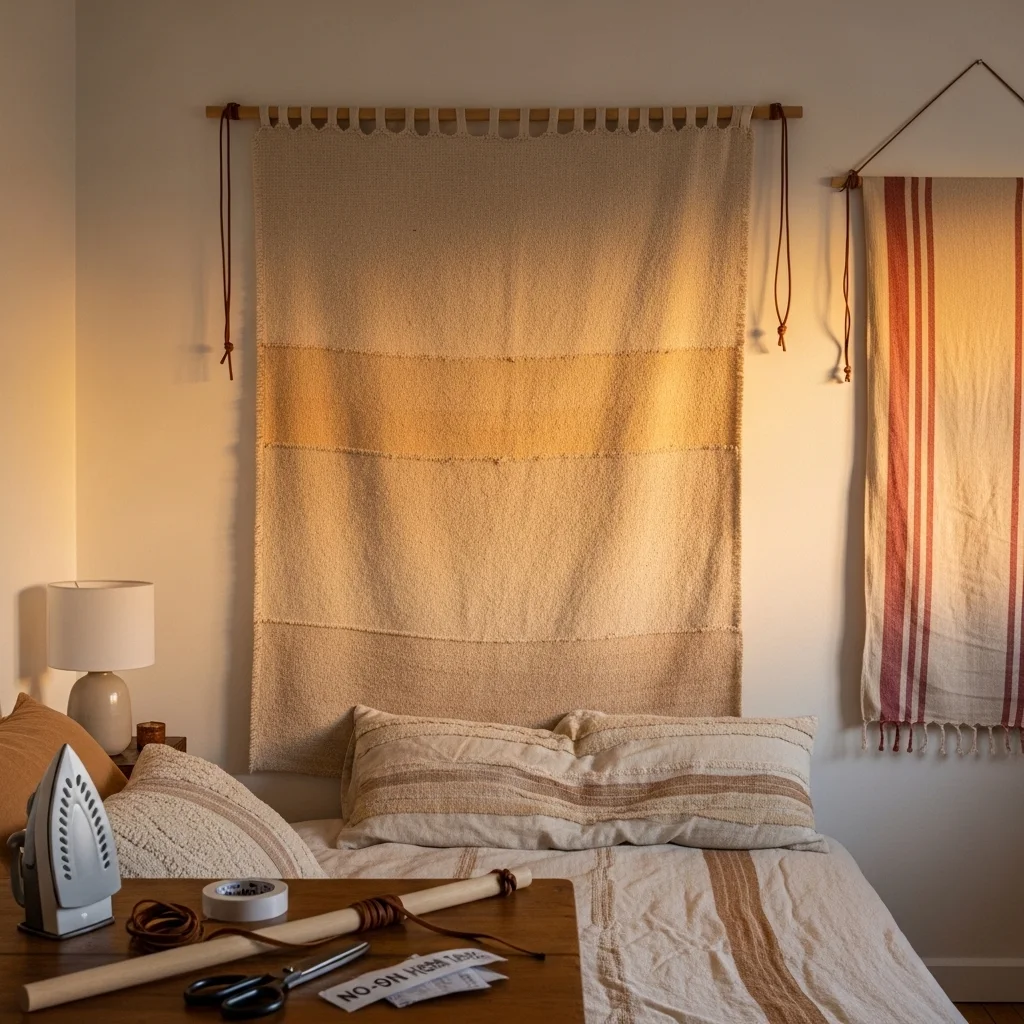
2. Macramé Wall Hanging (Easier Than You’d Think)
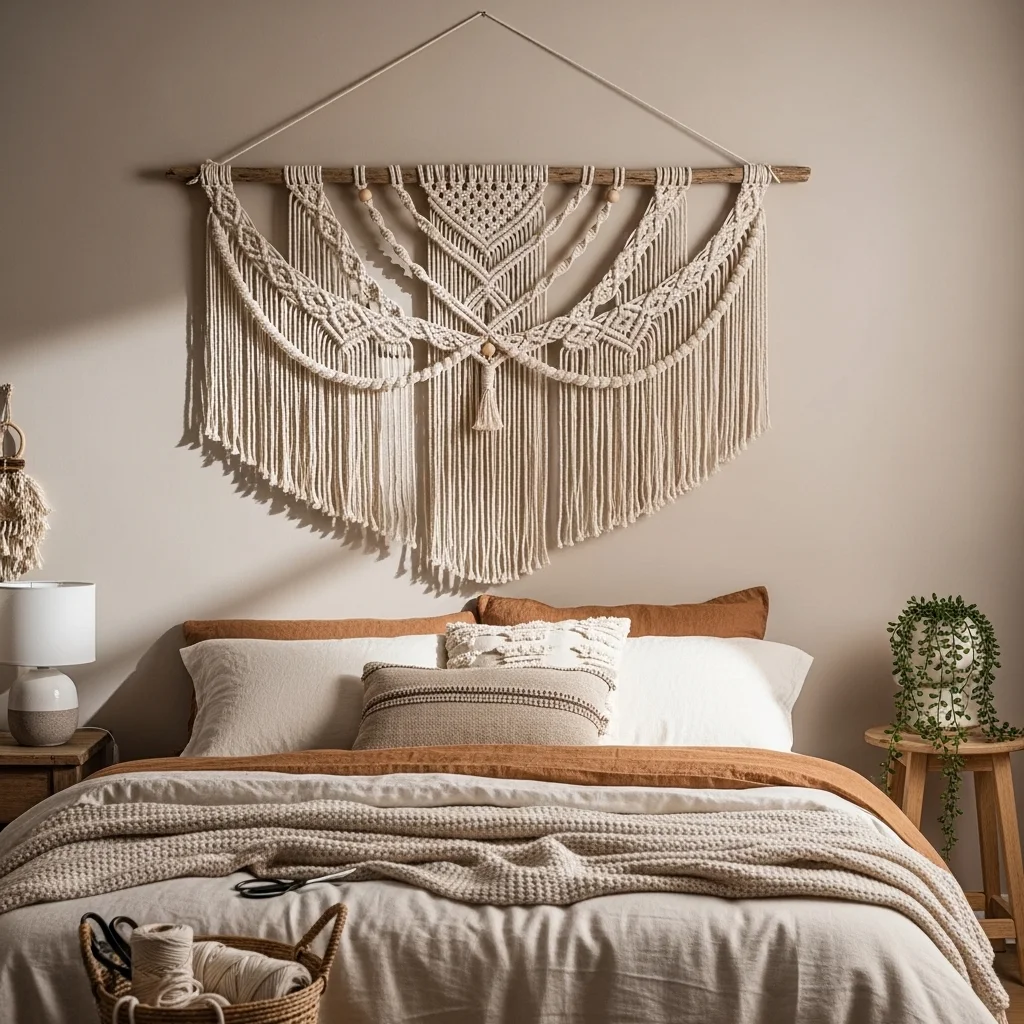
I put off trying macramé for years because it looked impossibly complex. Then I watched my neighbor make one in about two hours while we sat on her patio drinking wine, and I realized I’d been intimidated by something that’s basically just fancy knot-tying.
My first wall hanging was a simple design using about 150 feet of 3mm cotton cord (around $12 from a craft store) and a piece of driftwood I found at the beach. The only knots I needed to learn were the square knot and the half-hitch, both of which took maybe ten minutes to get comfortable with.
I’m not going to lie, my first attempt looked a bit wonky. The tension wasn’t consistent, so some parts hung tighter than others. But here’s the beautiful thing about macramé: the handmade imperfections are part of the charm. Nobody looks at a macramé piece and expects machine precision.
The project that hangs above my bed now is my fourth attempt, and it took about four hours spread over a weekend. I used natural cotton rope in an off-white shade, incorporated some wooden beads I found at a craft store, and created a piece that’s roughly 2 feet wide by 3 feet long. Total cost was under $25.
What I learned: Buy more cord than you think you need. I ran short on my second project, and the dye lot of my replacement cord didn’t quite match; you could tell in certain light. Also, your arms will get tired. Take breaks.
There are countless free patterns available online, and once you understand the basic knots, you can improvise and create your own designs. I find the repetitive knotting genuinely meditative now, and the boho texture adds warmth to walls in a way that framed art just doesn’t.
3. Floating Shelves as Rotating Art Displays
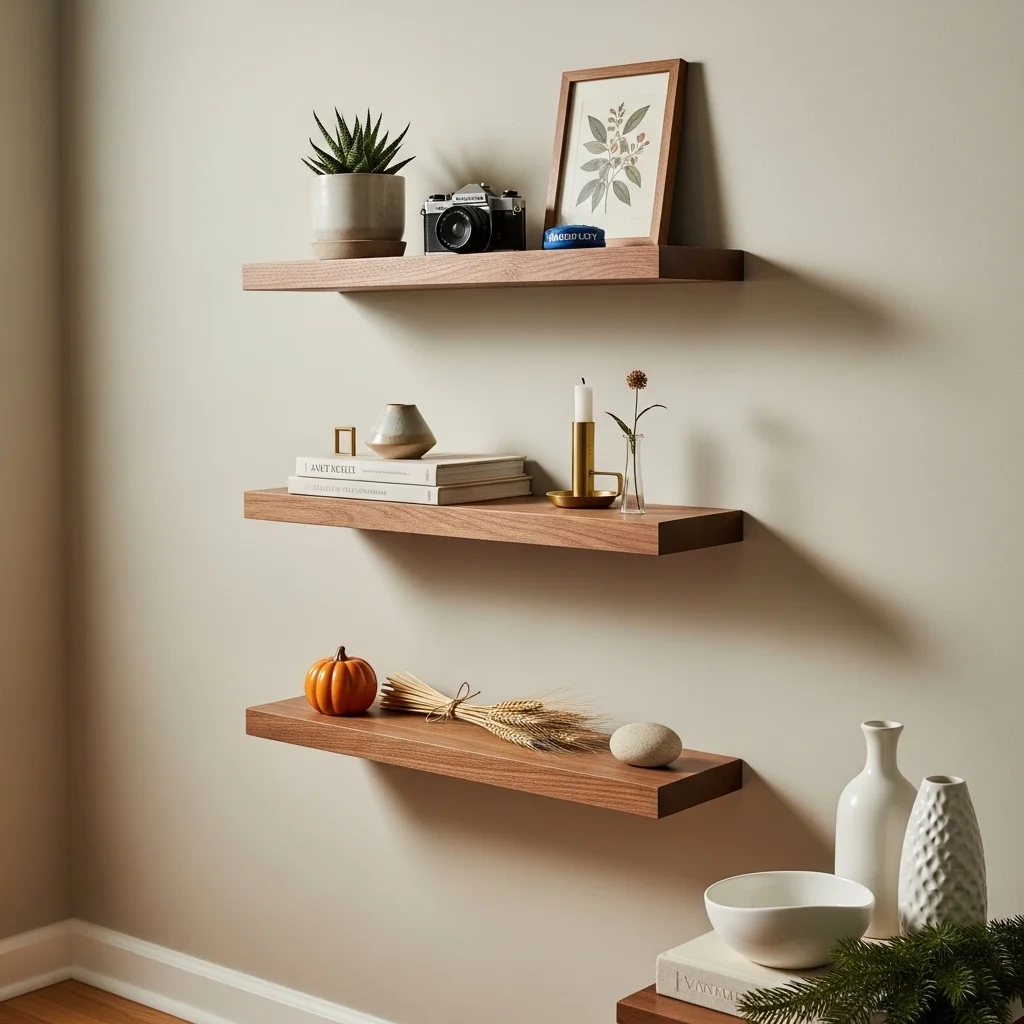
Floating shelves might seem like an obvious choice, but I’m including them because of how I use them, not just for storage, but as curated displays that I change seasonally.
I installed three walnut-stained floating shelves in my hallway (the wood shelves plus hardware cost about $45 from IKEA, installation took maybe an hour). Rather than loading them up with books or storage baskets, I keep them relatively sparse and treat them like three-dimensional canvases.
Right now, I’ve got a small potted succulent, a vintage camera I found at an estate sale, two art books stacked horizontally, a small framed print leaning against the wall, and a brass candlestick. The arrangement takes up maybe 40% of the shelf space, which keeps it from looking cluttered.
Every few months, I swap things out. In fall, I might add a small ceramic pumpkin and some dried wheat stems. During winter, I lean toward white ceramics and evergreen sprigs. The shelves themselves are a one-time investment, but they give me an excuse to continuously refresh my wall decor without buying new art or knocking more holes in the walls.
Pro tip: Use small adhesive museum putty under objects to keep them from sliding around. I learned this after a minor earthquake knocked my vintage camera onto the floor (thankfully it survived).
The key is editing. I probably try out twenty different objects before settling on the five or six that make the final cut for each shelf. It’s tempting to fill every inch of space, but restraint is what makes this look intentional rather than chaotic.
4. Large-Scale Abstract Painting (No Artistic Talent Required)
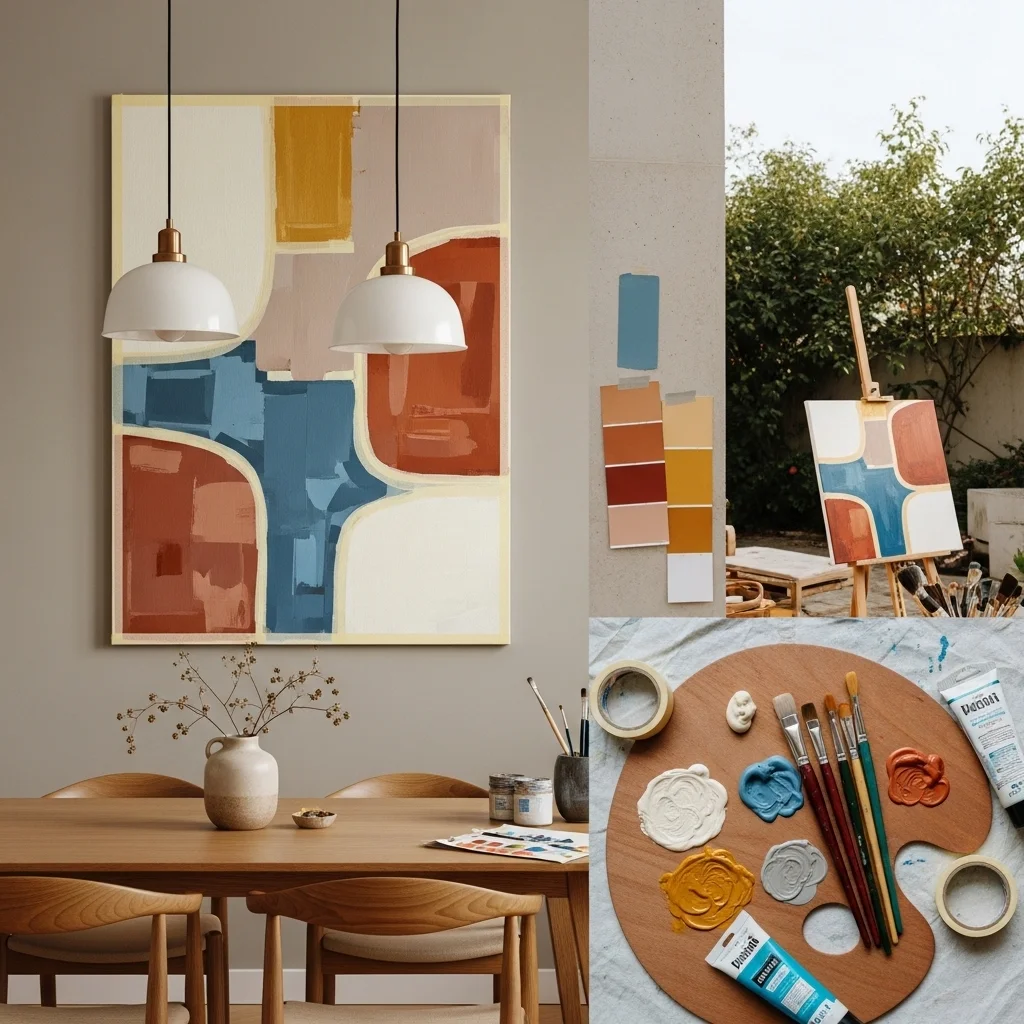
This is the project that shocked me most because I absolutely cannot draw or paint representational art. Stick figures are beyond my abilities. But abstract painting? That’s just color, texture, and composition, and you can make those decisions intuitively.
I created a 30×40 inch abstract canvas for my dining room using acrylic paints in cream, dusty blue, terracotta, and gold. The canvas cost about $25, and I spent another $30 on paints and brushes. I already had painter’s tape for creating clean lines.
My technique was simple: I painted the entire canvas cream, let it dry, then used painter’s tape to section off organic shapes. I filled those shapes with the other colors, layering and blending where I wanted softer transitions. Once everything dried, I peeled off the tape to reveal crisp edges between color blocks.
The whole process took maybe three hours, including drying time. I painted outside on a sunny afternoon, which meant everything dried quickly between layers.
Here’s the thing: because it’s abstract, there’s no “wrong” result. I wasn’t trying to paint a recognizable object, so I couldn’t fail at making it look like something. I was just putting colors I liked onto a canvas in a composition that felt balanced to me.
I’ve made four large canvases now, and they’re all hanging in different rooms. Even my mom, who was highly skeptical of my artistic abilities, admitted they look like something I could’ve bought at an art gallery. The oversized scale makes them feel substantial and expensive, even though each one cost under $60 in materials.
What actually matters: choosing colors that work with your room. I take paint swatches from the hardware store and tape them to the wall before I commit to buying full bottles of paint. This $0 step has saved me from expensive color mistakes.
5. Washi Tape Geometric Wall Design
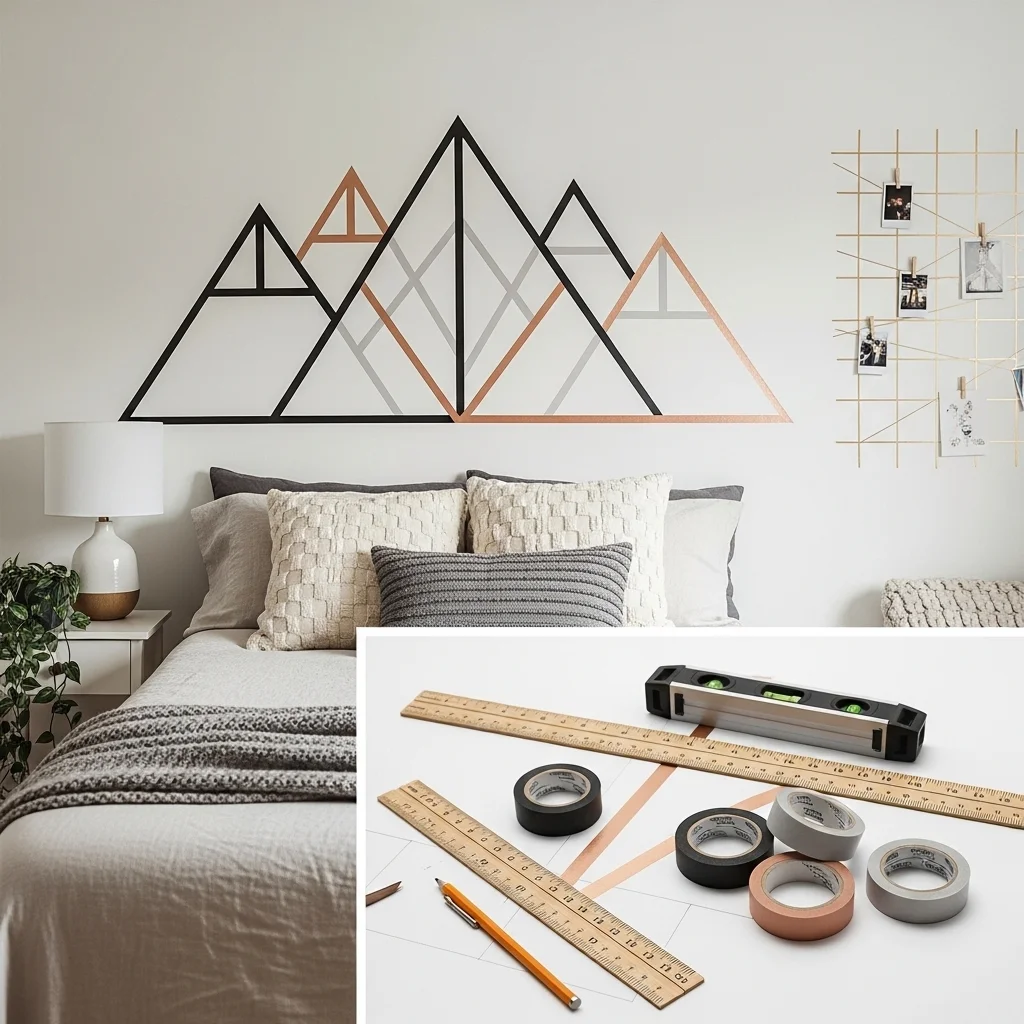
This was my solution for a rental apartment where I wasn’t allowed to paint an accent wall. Washi tape, that decorative Japanese masking tape, comes in hundreds of colors and patterns, removes cleanly without damaging paint, and costs about $3-5 per roll.
I created a geometric mountain design on my bedroom wall using three colors of washi tape: matte black, copper, and pale gray. The design is roughly 4 feet wide and 3 feet tall, positioned above my headboard. Total cost: $12 for tape. Time investment: about two hours.
The process is straightforward but requires patience. I sketched my design lightly with pencil first (which I could erase later, though the tape covers most of it anyway). Then I carefully applied the tape, using a ruler to keep lines straight and a level to make sure my horizontal lines were actually horizontal.
I’ve had this design up for over a year now, and the tape hasn’t budged or peeled. When I eventually move, it’ll remove cleanly, and my security deposit will remain intact.
The limitation: washi tape works best with geometric or line-based designs. I tried to create something more organic and flowing once, and the tape’s straight edge fought against the curves I wanted. Stick with triangles, chevrons, stripes, or other angular designs.
I’ve also used metallic washi tape to create a simple grid pattern on another wall, which I use as a photo display. I clip photos to the tape lines with tiny wooden clothespins. It’s like an ever-changing gallery wall that requires zero picture-hanging hardware.
6. Pegboard Organization Wall (Functional Meets Decorative)
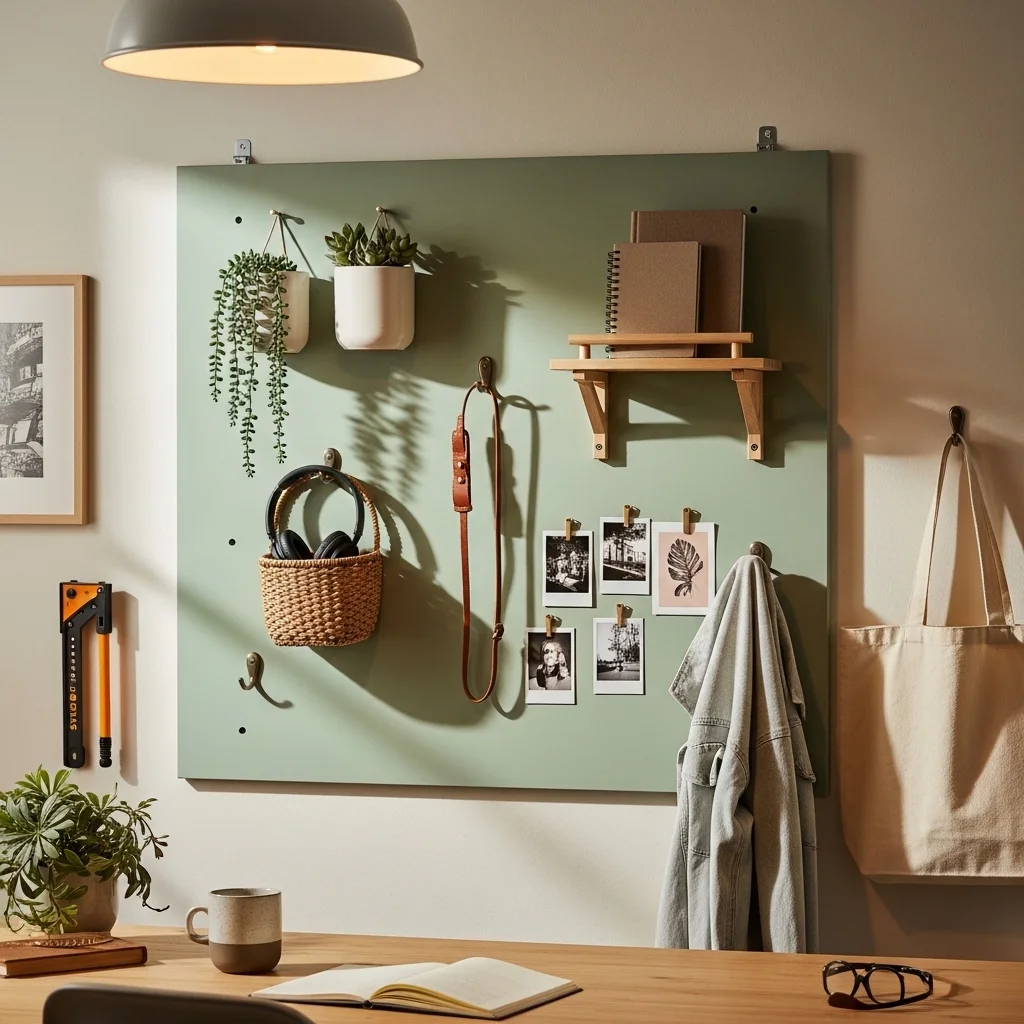
I installed a pegboard wall in my home office, and while it’s technically functional storage, it’s become one of my favorite pieces of wall decor. The visual interest comes from the objects displayed and the ability to rearrange them constantly.
I bought a 4×4 foot pegboard panel from Home Depot for about $20, had them cut it to my exact measurements, and painted it a soft sage green to match my office color scheme. The pegboard hooks and accessories cost another $15. I mounted it to the wall using furring strips behind it (necessary to create space for the pegs to insert), which added about $8 to the total cost.
Now my pegboard holds small planters, a basket for my headphones, hooks for my camera strap, a small shelf for notebooks, and clusters of photos attached with clips. It’s both incredibly useful and visually interesting, with the three-dimensional quality and the ability to change the arrangement keeping it from feeling static.
I’ve seen people create stunning pegboard walls in kitchens, craft rooms, and entryways. The key is restraint (again). A pegboard filled with every possible item looks messy. A pegboard with carefully selected objects, thoughtfully arranged with breathing room between them, looks intentional and stylish.
Installation note: make sure you mount this to wall studs if you’re hanging anything with real weight. I used a stud finder and made sure at least two mounting points hit solid wood. The setup is very sturdy now, but I did have one failed installation attempt in my first apartment, where I relied only on drywall anchors. It lasted about three weeks before pulling away from the wall.
7. Pressed Botanical Frames

This project combines a bit of nature collecting with some straightforward framing, and the results feel much more expensive and sophisticated than the minimal cost suggests.
I started pressing flowers and leaves about two years ago after a hiking trip where I collected some particularly beautiful ferns. I pressed them between the pages of heavy books (with parchment paper to protect the pages), left them for about two weeks, then mounted them in simple frames.
My current collection includes six frames of varying sizes (all thrifted for $2-5 each), each containing a different pressed botanical: eucalyptus, fern fronds, Queen Anne’s lace, maple leaves, wildflowers, and ornamental grass seed heads. They’re all mounted on cream cardstock and arranged in a cluster on my stairwell wall.
The whole collection cost maybe $40, mostly for the new glass I needed for a few frames and the acid-free cardstock. The pressing itself is free, and the collecting is a nice excuse to pay attention during walks.
The process is simple: collect botanicals, press them in heavy books for 2-3 weeks until completely dry, arrange them on cardstock, and secure with tiny dots of white glue or museum mounting corners. Frame and hang.
What I love about this project is the seasonality. I collect different plants throughout the year, so I can rotate what’s hanging based on the season. Fall leaves in autumn, spring wildflowers in March, summer grasses in July. It keeps my walls feeling current and connected to what’s actually happening outside.
Warning: make sure everything is completely dry before framing, or you’ll get mold. I learned this the hard way with a beautiful but slightly-too-damp fern that developed spots after a month in the frame. Patience during the pressing stage is non-negotiable.
8. Textured Fabric Wall Hanging
I fell into this project almost by accident when I found a beautiful piece of vintage linen at an estate sale. It had an interesting weave and lovely natural color variation, and I paid $8 for about 2 yards of it.
I hemmed the top and bottom edges (very roughly, my sewing skills are basic), inserted a wooden dowel through the top hem, and hung it from a leather cord attached to the dowel ends. The piece hangs in my bedroom, roughly 3 feet wide by 4 feet long, and adds incredible texture to the space.
Since then, I’ve created similar pieces using:
- Vintage Turkish towels
- Naturally dyed canvas
- Textured woven blankets
- Even an interesting piece of burlap I found
The key is choosing fabric with visual or textural interest something with weave variation, color shifts, or pattern. Plain flat fabric won’t have the same impact.
This is genuinely one of the easiest projects on this list. If you can sew a straight line (or even a somewhat wobbly line, mine definitely aren’t perfect), you can do this. If you can’t sew at all, fabric glue works fine for the hem, or you can use iron-on hem tape.
Cost: Entirely dependent on your fabric source. Thrifted or estate sale textiles can be $5-20. New fabric by the yard might run $15-40 depending on quality and size. The dowel and hanging cord add maybe $5-8.
I’ve seen people do this with tapestries, vintage scarves, even interesting curtain panels. One friend stretched fabric over a large wooden frame like a canvas, which gave it a more structured look. The possibilities are endless, and the impact is significant for minimal effort.
9. Mirror Cluster Wall
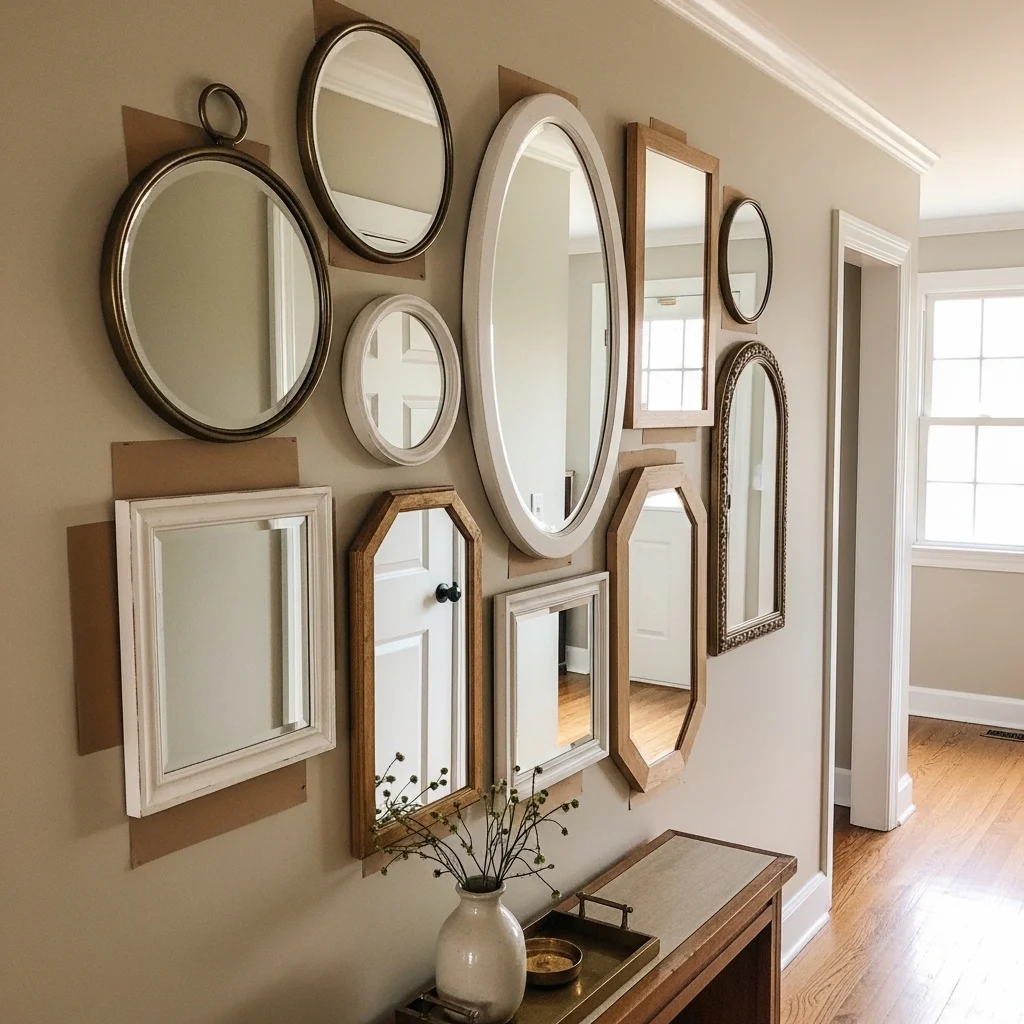
This is my most recent project, and it’s dramatically changed how a small, dark hallway feels in my house. Rather than hanging one large mirror, I created a cluster of mirrors in different shapes and sizes, all thrifted or bought from discount stores.
I collected nine mirrors over about a month: rounds, rectangles, an oval, even an octagonal one. None of them match, which is exactly the point. The frames range from brass to painted wood to plain frameless edges. Total investment was about $75 for all nine mirrors, each costing between $5-15.
The cluster covers roughly 5 feet of wall space and is arranged in an organic composition rather than a strict grid. The varying reflective surfaces catch light from a nearby window and bounce it around, making the hallway feel significantly brighter and more spacious.
Installation approach: I used the same kraft paper template method I described for the gallery wall. This was especially important with mirrors because they’re heavier than frames, and I wanted to be certain about placement before committing to nail holes.
What makes this work visually is the variety if all the mirrors were the same shape and size, it would look more like a design mistake than an intentional choice. The mix of sizes and shapes makes it clearly deliberate.
I’ve seen similar projects done with all circular mirrors in graduating sizes, which also looks great. The key principle is repetition of a theme (in this case, mirrors) with enough variation to keep it interesting.
Weight consideration: Make sure you’re using appropriate wall anchors. Mirrors are heavy. I used heavy-duty picture hangers rated for at least twice the weight of each mirror, and everything is very secure. This is not a project for command strips unless you’re working with very small, lightweight mirrors.
10. Hand-Lettered Quote on Wood or Canvas

I saved this for last because it’s the most personal of all the projects I’ve done. I’m including it despite my initial skepticism of “Live Laugh Love” style wall decor because I’ve learned that the right words in the right style can be meaningful rather than trite.
My version is a quote from a favorite book, hand-lettered onto a large piece of sanded wood in simple black paint. It hangs in my office and is something I genuinely connect with, not just generic inspiration.
Here’s the process I used:
I bought a piece of pine board from the hardware store (about $12), sanded it smooth, and applied a light whitewash stain. Once dry, I printed my quote in the font and size I wanted, then rubbed graphite pencil on the back of the paper (essentially making carbon paper). I positioned the printout on the wood and traced over the letters, which transferred a light graphite outline to the wood surface.
Then I carefully painted over the graphite outlines with a small brush and black acrylic paint. It took about two hours and required a steady hand, but the tracing method meant I didn’t need perfect hand-lettering skills.
I added picture-hanging hardware to the back and mounted it to the wall. The whole project cost under $20 and took an afternoon.
The crucial part: choosing a quote that actually means something to you. I’ve been in homes with beautiful hand-lettered signs that say things the homeowner probably doesn’t think about twice. Pick words you actually want to read every day.
Alternative approach: if you’re not confident painting letters, you can use vinyl letter stickers (available at craft stores) to spell out your quote. The look is different, cleaner, and more modern but equally effective.
I’ve also done versions on canvas instead of wood, which works well for lighter-colored palettes and more contemporary spaces. The wood version feels more rustic and organic.
What I’ve Learned About DIY Wall Decor
After completing dozens of wall projects over the past few years, a few themes have emerged:
Imperfection is fine. Actually, it’s better than fine; it’s what makes DIY pieces look handmade rather than mass-produced. The slight wobble in my hand-painted letters, the tension variations in my macramé, the not-quite-perfect spacing in my gallery wall these “flaws” are signatures of the handmade process.
Start with what you have. Several of my favorite projects began with materials I already owned or found for free. The botanical pressings, the fabric wall hanging from estate sale linen, the driftwood for macramé, working with found or existing materials often leads to more interesting results than starting from scratch with all-new supplies.
The 60% rule: I’ve learned that wall decor should cover roughly 60-75% of a blank wall space to feel balanced. Too little looks sparse and disconnected. Too much feels overwhelming. This rule has helped me size projects appropriately.
Lighting matters enormously. The same piece can look completely different depending on whether it’s lit with natural light, warm artificial light, or cool artificial light. I try to view my projects at different times of day before final installation to make sure they work in varying conditions.
Give projects time. My best work has happened when I didn’t rush. The gallery wall that evolved over two months is better than it would have been if I’d forced it together in a weekend. The botanical collection that builds seasonally feels more curated than if I’d frantically pressed a bunch of plants in one week.
The Real Cost and Time Investment
Let’s be honest about resources:
Time: These projects ranged from 1-2 hours (washi tape design, simple fabric hanging) to ongoing multi-month efforts (collecting frames and botanicals). Most fell in the 2-4 hour range for actual execution once I had materials.
Money: The cheapest project was the washi tape design at $12. The most expensive was the mirror cluster at $75. Average cost was probably around $35 per project. That’s dramatically less expensive than buying comparable wall art, where a single large piece could easily cost $100-300.
Skill level: Honestly? Everything here is beginner-friendly. I had no special skills when I started. I’ve learned what I needed through YouTube videos, trial and error, and occasionally asking my craftier friends for guidance.
The mistakes I’ve made, and there have been many, rarely resulted in wasted money. Usually, they just meant I had to sand something down and try again, or take down a poorly arranged gallery wall and reposition the frames.
Making It Work in Your Space
These ten ideas have worked in my home, which is a mix of mid-century modern furniture, lots of plants, and a generally neutral color palette with warm wood tones. Your aesthetic is probably different, and that’s perfect. These projects are all adaptable.
The bohemian macramé might not work in an ultra-modern minimalist space, but the large-scale abstract painting probably would. The rustic wood quote board might not fit a glamorous decor style, but the mirror cluster absolutely could.
Pay attention to what you’re naturally drawn to. If you find yourself photographing interesting walls on Instagram, saving certain types of images on Pinterest, or lingering in particular sections of home stores, you’re getting data about your aesthetic preferences. Use that information.
Also, don’t feel obligated to fill every wall. Some walls should breathe. I’ve got a completely blank wall in my living room, and it’s intentional that emptiness makes the decorated walls feel more significant.
The Most Important Thing Nobody Tells You
Here’s what I wish I’d known when I started: your first attempt at any of these projects probably won’t be your best work. That’s not a reason to avoid starting. It’s just reality.
My first gallery wall was okay but not great. My fourth gallery wall is genuinely beautiful. My first macramé piece lives in a closet. My third macramé piece gets compliments from everyone who sees it.
You get better by doing, not by waiting until you feel ready. I’ve wasted more time overthinking projects than I’ve ever spent actually executing them poorly.
The walls in your home should reflect you your interests, your aesthetic preferences, your experiences, the things you find beautiful. DIY wall decor is one of the most direct ways to make that happen without spending a fortune or needing to be an artist.
Start with whichever project on this list appeals to you most. Give yourself permission to make it imperfectly. Hang it on your wall and live with it for a while. You might love it immediately, or you might decide to adjust it later. Either outcome is fine.
Your walls are just waiting for you to make them interesting.