I’ll never forget the look on my neighbor Mia’s face when she told me she got quoted $18,000 for a basic bathroom remodel. Her powder room was maybe 40 square feet. The contractor proposed a full gut, and I didn’t need half of that. That conversation happened three years ago, and it’s stuck with me because it represents a common misconception: that updating a bathroom requires taking out a second mortgage.
The truth is, bathroom renovations can be expensive, but they don’t have to be. I’ve spent the better part of a decade working on home improvement projects, talking to contractors, interviewing homeowners, and yes, getting my own hands dirty with DIY updates. What I’ve learned is that strategic, thoughtful changes can completely transform a bathroom without the financial devastation.
Let me walk you through ten renovation ideas that deliver real impact without requiring you to drain your savings account.
1. Paint: The Most Underestimated Game-Changer
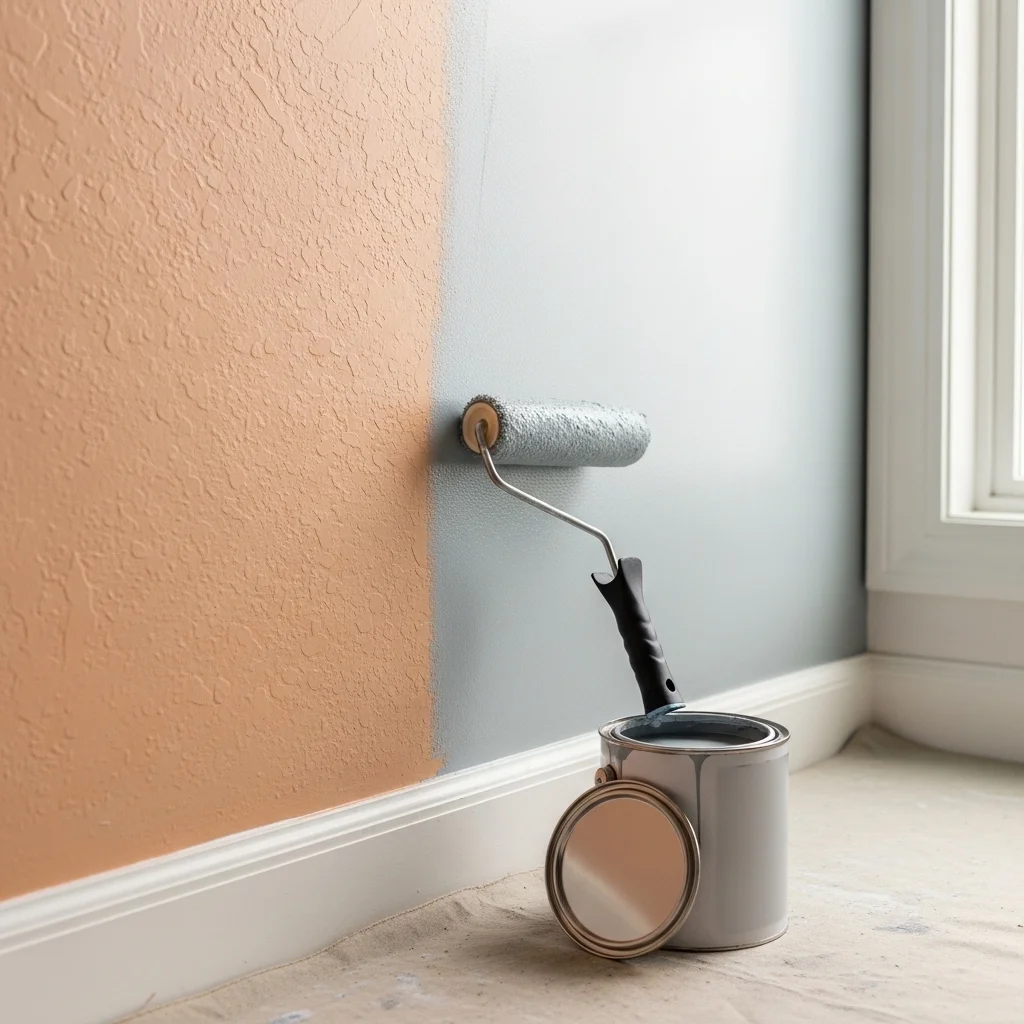
I know what you’re thinking, paint seems too obvious, maybe even boring. But hear me out.
The right paint color can make a cramped bathroom feel spacious, a dark bathroom feel bright, and an outdated bathroom feel contemporary. I watched my sister transform her 1980s peach-and-beige disaster into a serene spa-like space with nothing more than two gallons of soft gray paint and a weekend of work.
Here’s what makes bathroom paint different: you need moisture-resistant formulas. Regular flat paint will bubble and peel within months. Look for paints specifically labeled “bathroom” or “kitchen and bath.” Semi-gloss and satin finishes work best because they resist moisture and are easier to clean.
Cost breakdown: Quality bathroom paint runs $35-$50 per gallon. Most bathrooms need one to two gallons, putting your total investment around $50-$100 if you do it yourself.
Color selection matters more than you’d think. Light colors (soft whites, pale grays, gentle blues) make small bathrooms feel larger. If you have good natural light, you can play with darker, moodier colors like navy or charcoal. These create a boutique hotel vibe that’s very on-trend right now.
One caveat: proper prep work isn’t optional. Clean the walls thoroughly with a TSP substitute, repair any cracks or holes, and use a primer if you’re making a dramatic color change. I’ve seen people skip these steps and wonder why their paint job looks amateurish within weeks.
2. Update the Hardware and Fixtures
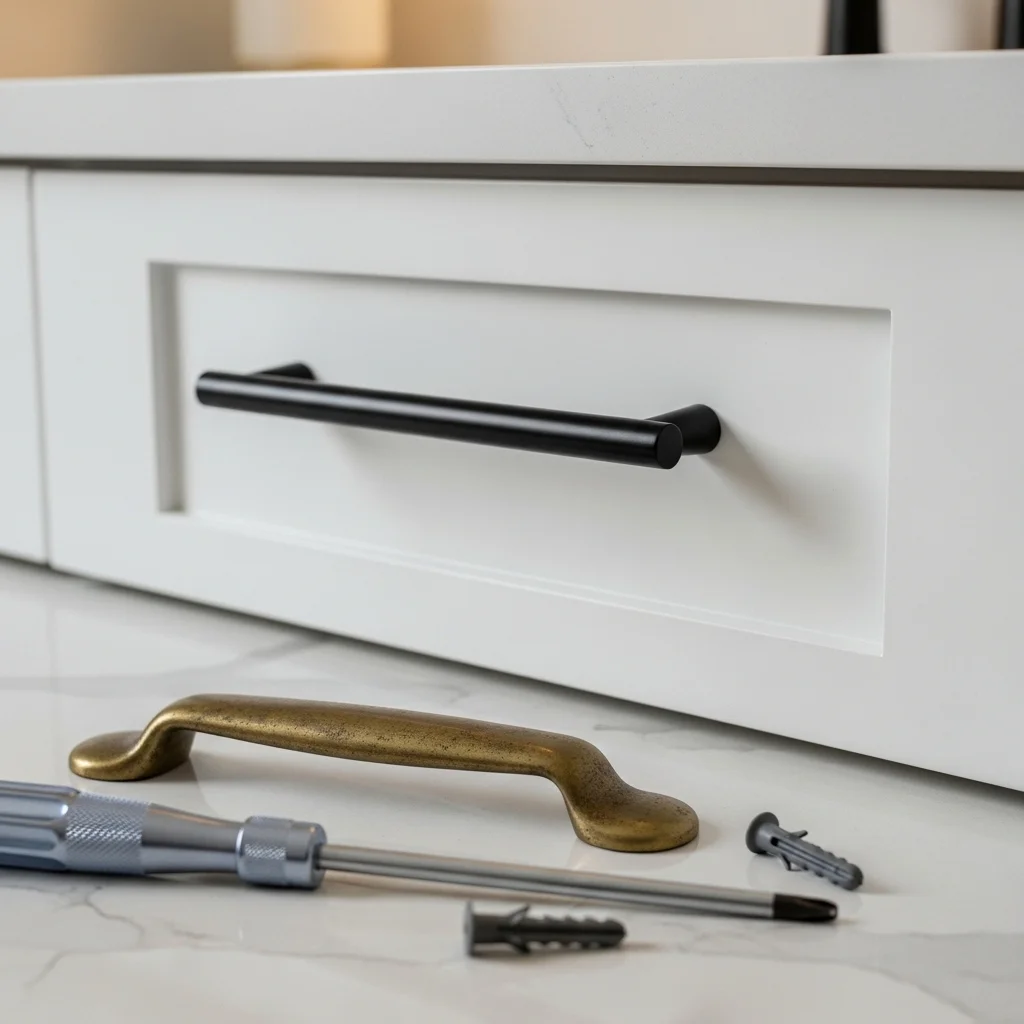
This is probably the highest impact-to-cost ratio change you can make, and it’s criminally overlooked.
Walk into your bathroom right now and look at your towel bars, toilet paper holder, cabinet knobs, and drawer pulls. If they’re builder-grade brass from 1995, or worse, that weird brass-pretending-to-be-antique finish, you’ve found your problem. These small details scream “dated” louder than almost anything else.
Last year, I helped a friend update all the hardware in her hall bathroom. We spent $120 total at a home improvement store, and the transformation was remarkable. We replaced:
- Two towel bars
- A toilet paper holder
- A robe hook
- Six cabinet knobs
- Two drawer pulls
- The faucet handles (not the whole faucet, just the handles)
Everything went from shiny brass to matte black, and suddenly the bathroom looked like it belonged in a design magazine instead of a time capsule.
Cost range: $80-$200, depending on finish and quantity
The installation is straightforward for most items. Towel bars and TP holders usually mount with screws into drywall anchors. Cabinet hardware is even easier; just match the existing hole spacing, or fill old holes with wood filler if you want a different configuration.
Current popular finishes include matte black, brushed nickel, brushed gold, and oil-rubbed bronze. My personal take? Choose based on what you’ll still like in five years. Matte black is trendy now, but brushed nickel is timeless.
3. Replace That Builder-Grade Mirror
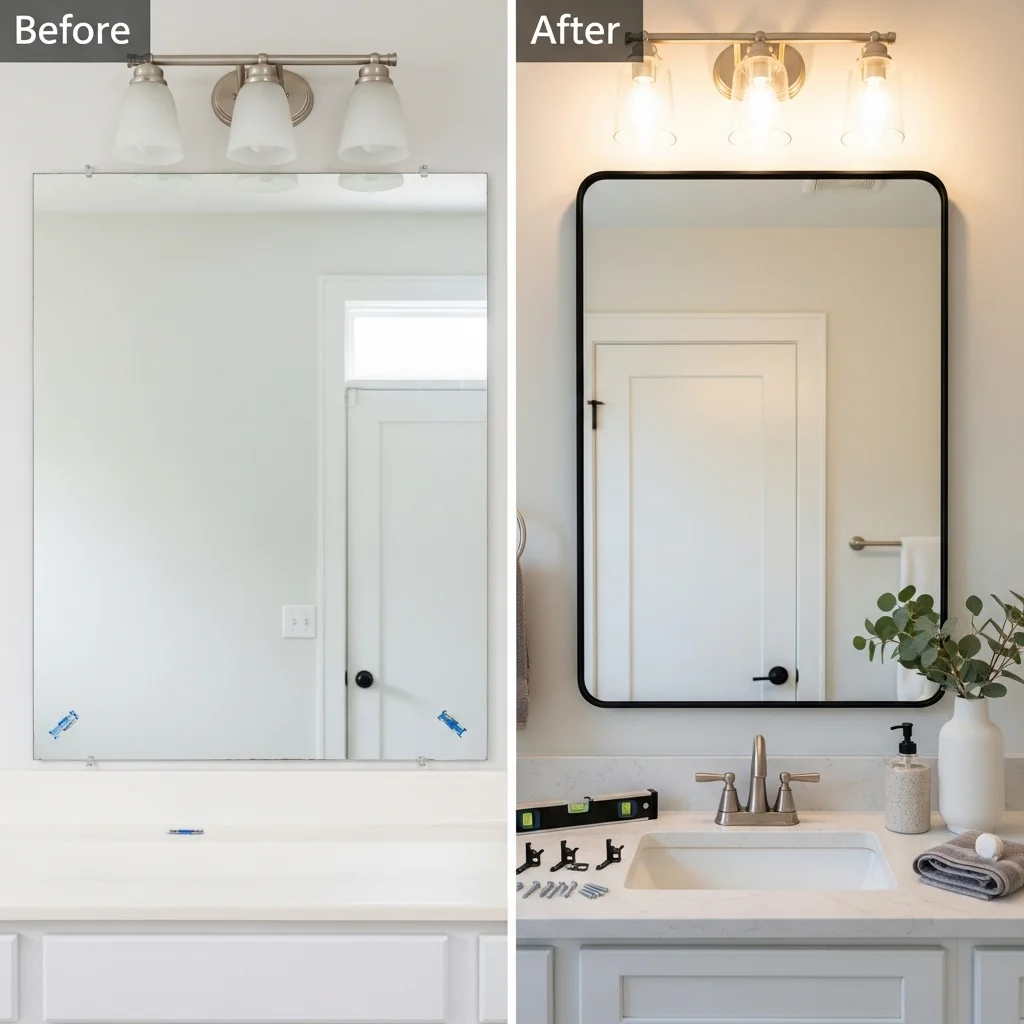
Standard builder mirrors those frameless plate glass rectangles, which are functional but utterly characterless. Replacing yours is easier than you think.
You have two main approaches:
Frame the existing mirror: Companies sell frame kits that essentially glue onto your existing mirror. These run $80-$150 and take about an hour to install. The result looks custom without the custom price tag. I’ve seen these work beautifully in bathrooms where the mirror size is good, but the look is boring.
Replace with a new mirror: If your mirror is an awkward size or you want to change dimensions, replacement mirrors are surprisingly affordable. A 30×40-inch framed mirror costs $100-$250 at home stores, sometimes less if you catch a sale.
I recently opted for replacement in my guest bathroom because the original mirror was enormous and outdated. I found a 24×36-inch mirror with a simple black frame for $89. It took twenty minutes to hang using the included mounting hardware, and it completely changed the room’s focal point.
Installation tip: If you’re removing an old glued mirror, know that it’s tedious and potentially dangerous. Builders often use mastic to adhere mirrors directly to walls. If you’re not comfortable with this, hire it out. It’s usually $50-$100 for removal, which is worth it for safety and not destroying your wall.
4. Upgrade the Lighting
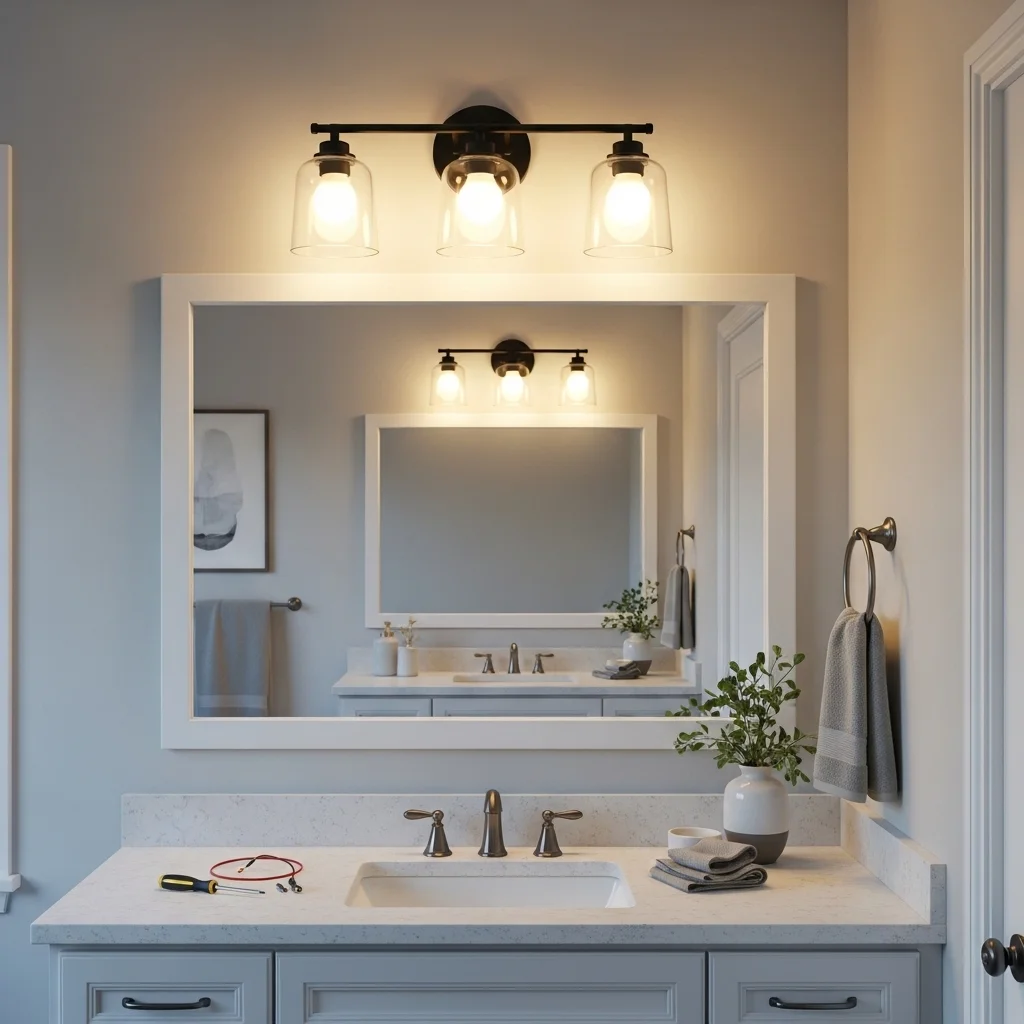
Lighting is where many bathrooms fail spectacularly, yet it’s rarely addressed in budget renovations.
That single dome light in the center of your ceiling? It’s creating shadows on your face and making the entire space feel institutional. Here’s the thing about bathroom lighting: you want multiple sources at different levels.
The most impactful upgrade is the vanity lighting, the fixture above or beside your mirror. This is what you use when applying makeup, shaving, or any task requiring decent visibility.
I replaced a horizontal 24-inch strip light with harsh fluorescent bulbs with a three-light vanity fixture from a home improvement store. The new fixture cost $65, used standard medium-base bulbs, and took maybe 45 minutes to install. The difference was night and day literally.
Budget: $60-$200 for a quality vanity light fixture
A few things I’ve learned about bathroom lighting:
LED bulbs are non-negotiable in my opinion. They last forever, use minimal energy, and the light quality has improved dramatically. Look for bulbs in the 2700K-3000K range for flattering, warm white light. Anything over 4000K will make you look like you’re in an interrogation room.
If your bathroom has no natural light, consider adding a second fixture if your budget allows. A simple ceiling flush-mount light ($40-$80) plus your vanity lighting creates more balanced illumination.
For the DIY-hesitant: yes, you’re dealing with electrical, but it’s not complicated if you’re replacing an existing fixture. Turn off the breaker, connect three wires (black to black, white to white, ground to ground), secure the fixture, and restore power. If that still sounds intimidating, an electrician will charge $75-$150 to install a light fixture you provide.
Read also: Top 10 Spa Bathroom Decor Ideas That Actually Feel Like A Real Spa
5. Add Open Shelving
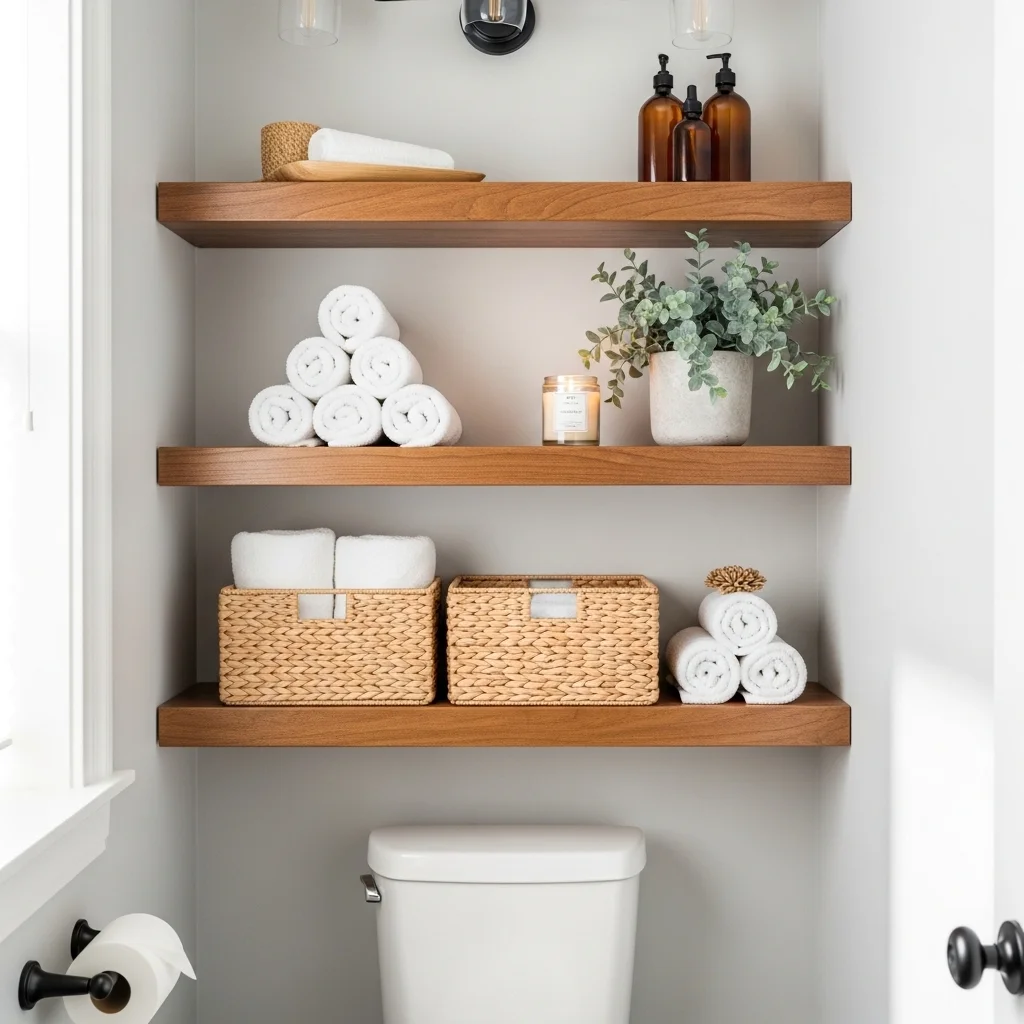
Storage is always at a premium in bathrooms, and open shelving solves this while adding visual interest.
The beauty of open shelving is its versatility. You can go the floating shelf route (very modern), traditional bracketed shelves (more classic), or even ladder shelving (trendy and no mounting required).
I installed three floating shelves in my master bathroom above the toilet that typically wasted vertical space. The shelves were $25 each from a big box store, and mounting them took an afternoon because I’m obsessive about getting them level. I store rolled towels, a few decorative items, and everyday products in attractive containers.
Cost: $25-$100, depending on materials and size
Here’s what works: Keep it organized and intentional. Open shelving full of clutter looks terrible. Invest in some matching baskets or containers ($3-$8 each at discount stores) to corral smaller items. Rolled towels, plants, candles, and carefully selected bottles create a spa-like aesthetic.
What doesn’t work: Avoiding maintenance. Open shelves collect dust and require regular tidying. If you’re not someone who enjoys keeping things curated, closed storage might be better for you.
Material matters too. In humid bathrooms, solid wood shelves need proper sealing to prevent warping. I prefer wood-look composite materials or actual reclaimed wood that’s been treated. Glass shelves create an airy feel but show water spots and require frequent cleaning.
6. Refresh the Grout
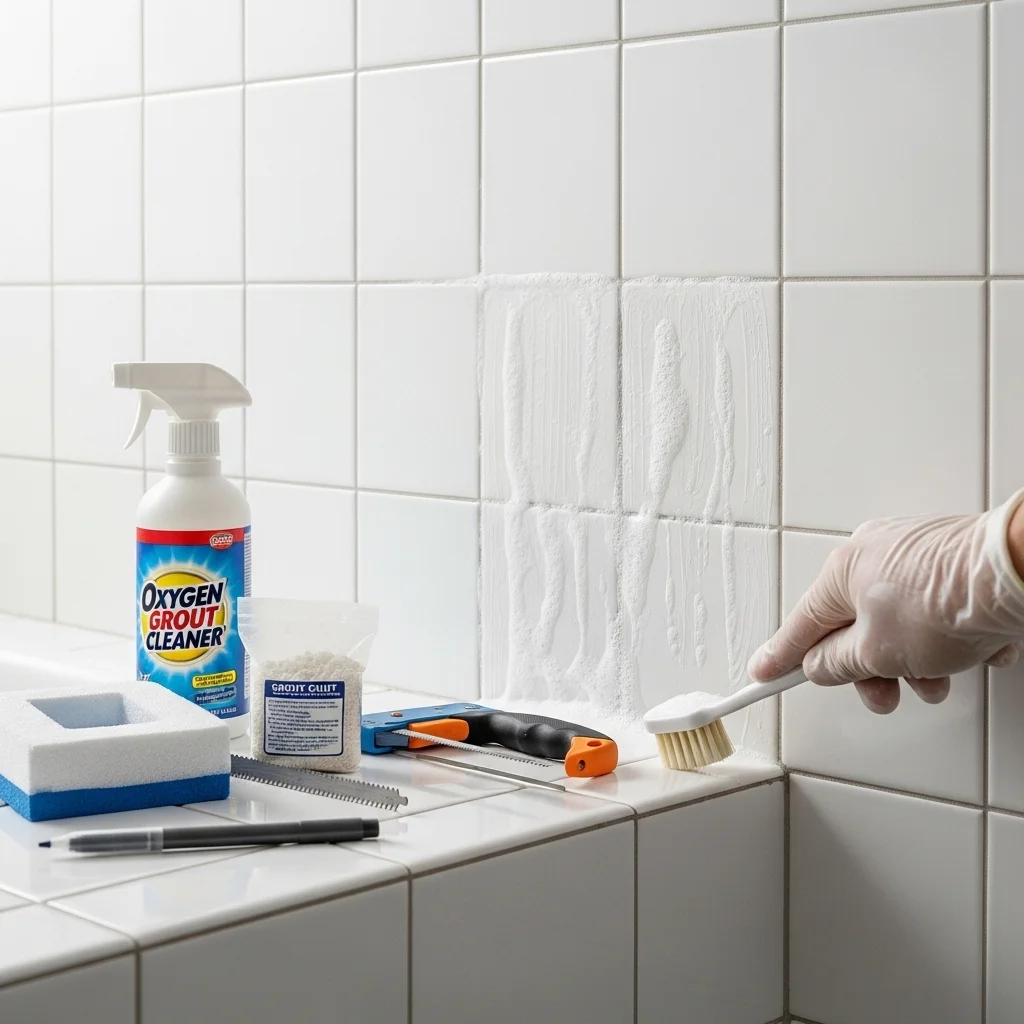
This is unglamorous work, but few things age a bathroom faster than dingy, discolored grout.
You have two approaches: cleaning or replacing. Start with cleaning because it’s the cheaper option.
A quality grout cleaner and a grout brush (or an old toothbrush for small areas) can work minor miracles. I’ve used oxygen bleach-based cleaners with impressive results. Brands like OxiClean make bathroom-specific formulas. The process is straightforward: apply cleaner, let it sit for 10-15 minutes, scrub, rinse, repeat if necessary.
Deep cleaning cost: $10-$25 in supplies
If cleaning doesn’t cut it, regrouting is next. This is more involved but still manageable for a DIY-er. You’ll need a grout saw to remove old grout (around $6), new grout ($10-$15 per bag), a grout float ($8), and sealer ($12).
I regrouted my shower last spring. The old grout was cracked and stained beyond repair. It took me most of a Saturday, but the transformation was remarkable. The white tiles looked new again, and the fresh grout lines created crisp, clean definition.
Full regrout cost: $40-$80 in materials for an average bathroom
For those who want the look of new grout without the labor, grout pens exist. These are markers filled with grout-colored paint that you trace over existing grout lines. They’re about $8-$12 and work surprisingly well for small areas or touch-ups. I’m honestly skeptical of shortcut products usually, but I tested these in an inconspicuous area and was impressed. They won’t hold up to the abuse that floor grout endures, but for wall tiles, they’re a legitimate option.
7. Install a New Toilet Seat
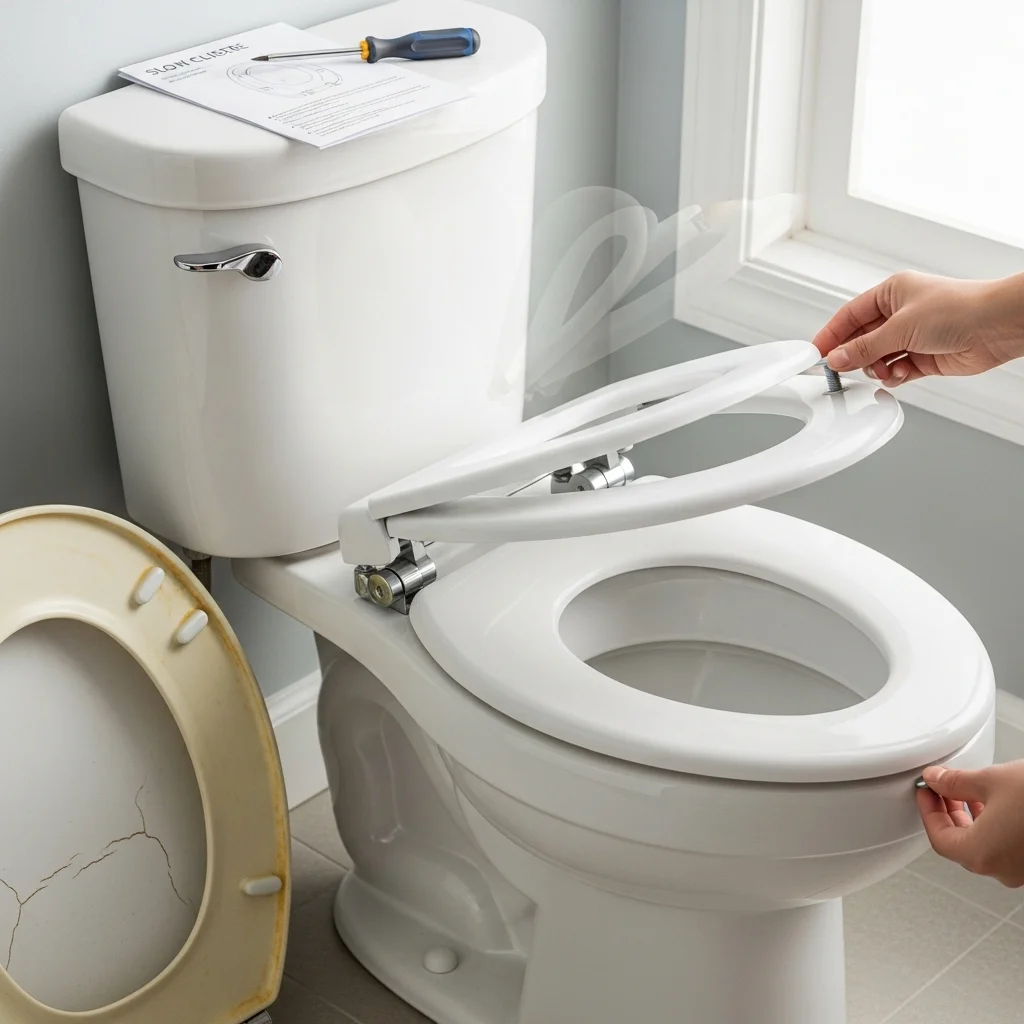
Of all the affordable updates, this might be the most immediately noticeable to anyone actually using your bathroom.
Toilet seats yellow over time, develop cracks, come loose, and generally look gross. A new one is $20-$60 and takes about ten minutes to install with basic tools you probably already own.
But here’s where it gets interesting: toilet seats have evolved. Soft-close seats ($30-$50) prevent that jarring slam, something I didn’t know I needed until I had one, and now I want them on every toilet. Quick-release seats ($25-$45) have buttons that allow you to remove the seat entirely for deep cleaning, which is genuinely helpful.
I recently installed a soft-close, quick-release seat in my powder room, and I’m not exaggerating when I say guests have commented on it. It’s a small detail that signals you pay attention to the experience people have in your home.
Cost: $20-$60
Installation is genuinely simple: locate the two bolts securing your current seat to the toilet, unscrew them (they might be corroded; WD-40 helps), remove the old seat, position the new seat, and tighten the new bolts. Done.
One thing to watch: measure your toilet bowl before buying. Round and elongated bowls require different seat sizes. Most seats indicate which they fit, but a quick measurement saves you a return trip to the store.
Read also: Top 10 Spa-Like Bathroom Decor Ideas That Actually Work
8. Add a Stylish Shower Curtain and Accessories
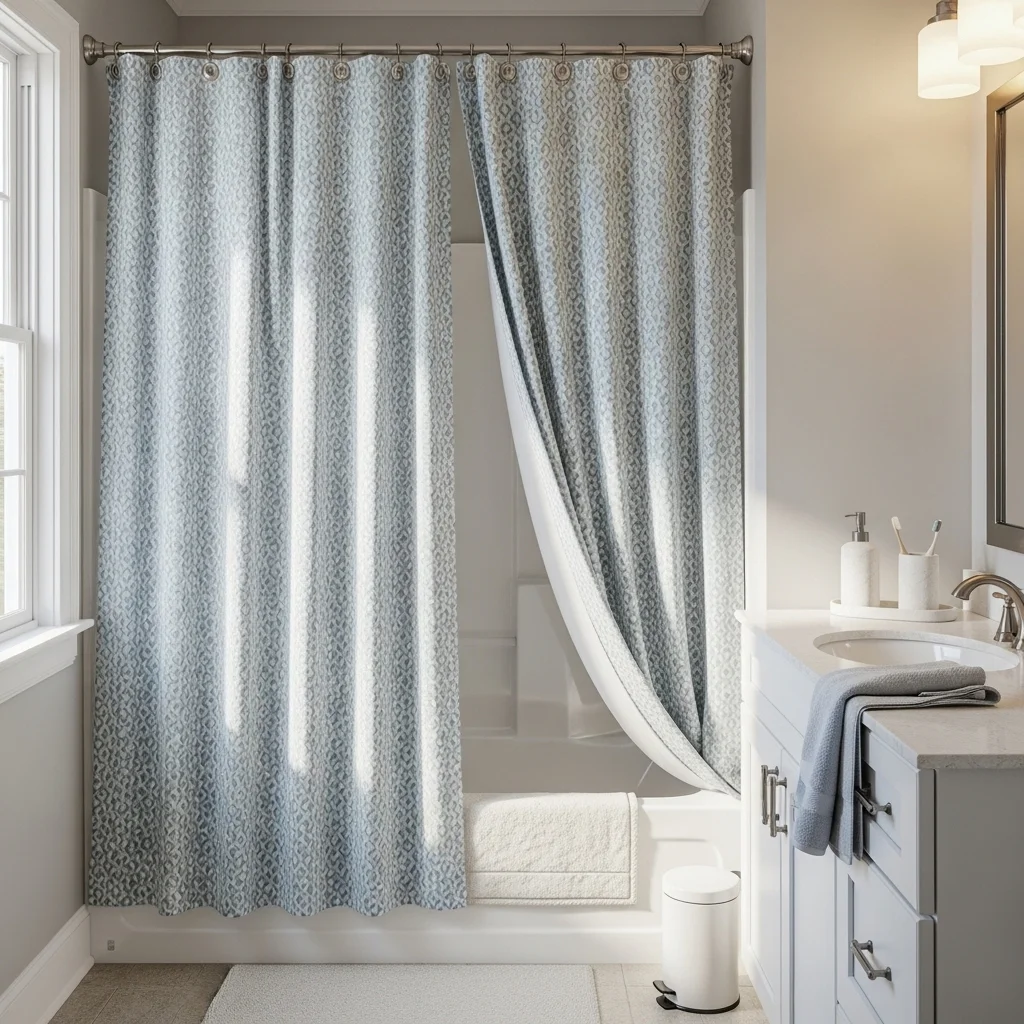
If you have a tub/shower combo, the shower curtain is a massive visual element that people often treat as an afterthought.
I see this constantly: someone paints their bathroom a sophisticated gray, updates the hardware to brushed nickel, and then hangs a cheap, clear plastic liner with a $12 basic white curtain. It’s like wearing a tuxedo with flip-flops.
A quality shower curtain in a color or pattern that complements your bathroom runs $25-$60. Pair it with a nice liner ($10-$15) and updated curtain rings ($8-$20), and you’ve made a significant visual impact for under $100.
Total investment: $45-$100
I learned this lesson in my own home. I had a neutral bathroom and chose a shower curtain with a subtle geometric pattern in blues and grays. It became the room’s accent piece and tied everything together. The bathroom went from builder-basic to intentionally designed.
Fabric curtains need liners, but they’re machine washable and look infinitely better than plastic. If you prefer low-maintenance, some higher-end fabric-look curtains are actually polyester and can handle water without a liner, plus they’re mold-resistant.
Don’t overlook the coordinating accessories: the toothbrush holder, soap dispenser, and trash can. Matching sets cost $25-$50 and create cohesion. I know it seems minor, but visual consistency makes spaces feel more expensive than they are.
9. Update the Flooring (Smartly)
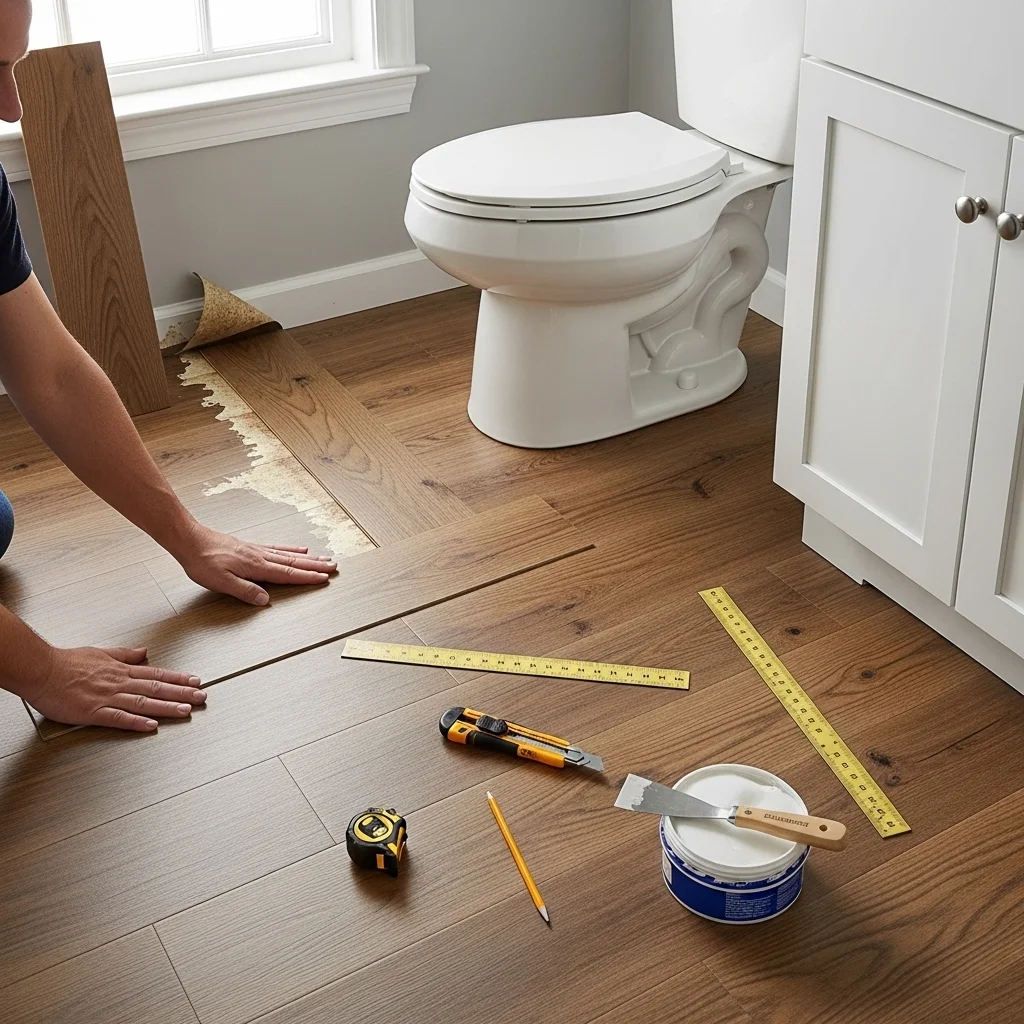
Full bathroom floor replacement can be expensive, but there are budget-friendly approaches that look great.
Peel-and-stick vinyl tiles have come a long way from their dingy reputation. Modern versions mimic natural stone, ceramic, and wood surprisingly well. They’re DIY-friendly, relatively inexpensive, and can go right over most existing floors.
I helped my parents install peel-and-stick vinyl planks in their guest bathroom over outdated linoleum. We spent $85 on flooring for a 5×8-foot space and completed the installation in about four hours, including prep time. Two years later, it’s holding up beautifully with no lifting or wear.
Cost: $1.50-$4.00 per square foot (so $75-$200 for an average bathroom)
The key to success with peel-and-stick flooring:
Surface preparation is everything. The existing floor must be clean, smooth, and level. We used a floor patch compound ($15) to fill a couple of low spots and scrubbed the floor thoroughly with TSP substitute.
Take your time with the layout. Measure twice, cut once. We dry-laid the entire floor before peeling any backing to ensure our pattern looked intentional, and we minimized small edge pieces.
Consider professional installation for ceramic tile. If you want actual ceramic or porcelain tile, the materials are affordable ($2-$6 per square foot), but installation is legitimately difficult. Floors must be level, tile must be cut precisely, and the labor is physically demanding. I’ve installed wall tile successfully, but I hired out the floor tile. Most contractors charge $5-$10 per square foot for labor, putting a full bathroom floor at $250-$500 installed.
Read also: How to Decorate Bathroom Walls Without Tiles
10. Refurbish Instead of Replace
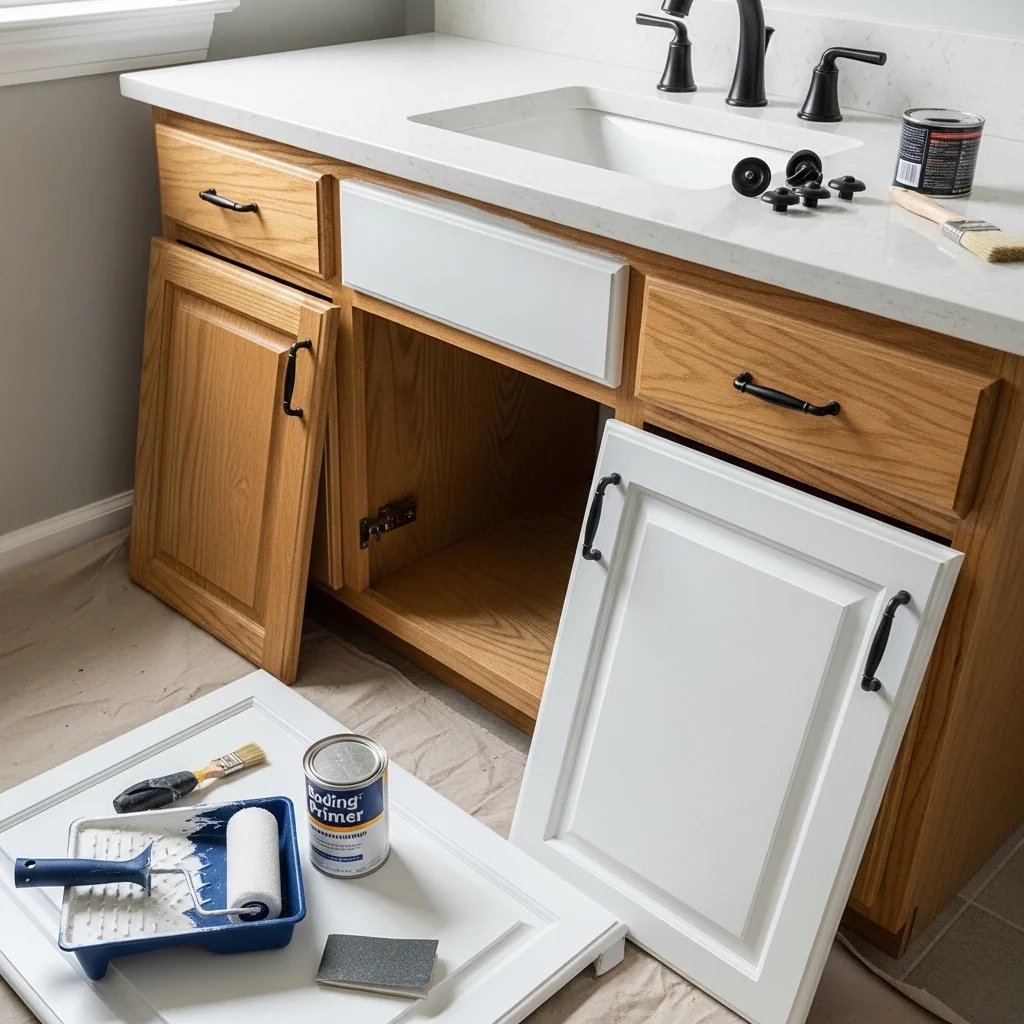
This is more of a philosophy than a single project, but it’s saved me (and people I’ve advised) thousands of dollars.
Before you rip out that dated vanity, consider: can it be saved?
Cabinets that are structurally sound can be painted or refinished for a fraction of replacement cost. I’ve painted bathroom vanities with specialty cabinet paint, and the results rival new cabinets.
The process: remove doors and hardware, clean everything with TSP substitute, sand lightly (220-grit), apply a bonding primer, paint with cabinet enamel, and reinstall. It’s a weekend project that costs $40-$80 in supplies versus $300-$800 for a new vanity.
I painted my oak vanity (very 1990s) white three years ago, updated the hardware to matte black, and replaced the cultured marble top with a prefab quartz top ($150 on sale). Total investment: about $220. A comparable new vanity with a countertop would’ve been $600-$800 minimum.
Vanity painting cost: $40-$80
Countertop replacement: $150-$400, depending on material
Other refurbishment opportunities:
Bathtub refinishing: Professional tub reglazing costs $300-$500 versus $1,000-$3,000 for replacement. The finish lasts 5-10 years with proper care. I’ve seen this work exceptionally well on old cast iron tubs that are structurally perfect but cosmetically worn.
Faucet refresh: Sometimes faucets just need cleaning and new handles rather than full replacement. Replacement handles and aerators cost $15-$40 and can make an outdated faucet look current.
Tile painting: Yes, you can paint tile. Special tile paints exist, and while I’m somewhat skeptical of their longevity in high-abuse areas like shower floors, I’ve seen excellent results on wall tiles and low-traffic floor tiles. A bathroom tile paint kit runs $25-$40.
Read also: Top 10 Luxury Bathroom Decor Ideas at Home
Making It All Work Together
Here’s what I’ve learned after countless bathroom projects: successful budget renovations require strategy, not just a list of cheap fixes.
Start with a plan. What bothers you most about your current bathroom? What would make the biggest difference to how it looks and functions? Prioritize those items.
Think cohesively. Random updates look random. Choose a color palette (usually three colors: a dominant neutral, a secondary neutral, and an accent) and select everything accordingly. My bathroom has white walls, gray flooring, and black/brass hardware. Every choice supports that scheme.
Consider timing. You don’t have to do everything at once. I spread my master bathroom renovation across six months, doing one or two projects per month as budget allowed. This also prevented the overwhelm of a complete bathroom gut job.
Mix DIY with professional help. I’m comfortable painting, installing shelving, and swapping light fixtures. I hire out anything involving plumbing connections, floor tile, or major electrical work. Know your limits.
Buy quality where it matters. I cheap out on decorative items I might change in a few years (shower curtain, accessories). I invest in things that need to last (faucets, lighting, flooring). A $200 light fixture that I’ll have for fifteen years is a better value than a $40 one that looks cheap and breaks in three years.
The Reality Check
Let me be honest about limitations because overpromising helps no one.
These budget ideas work beautifully for cosmetic updates and moderate improvements. They won’t fix structural issues, serious water damage, mold problems, or completely outdated plumbing. If your bathroom has soft spots in the floor, leaking shower pans, or knob-and-tube electrical wiring, you need a professional assessment and potentially a significant investment.
I’ve also learned that DIY isn’t always cheaper when you factor in time, potential mistakes, and tool investment. That $150 you save installing a toilet yourself might not feel worth it if you’re not comfortable with the process and spend six frustrating hours doing it. Be realistic about your skill level and available time.
And not every bathroom is a candidate for budget renovation. Sometimes the layout is so dysfunctional, the fixtures so outdated, or the style so deeply wrong that only a gut renovation makes sense. I helped a friend evaluate her 1950s pink tile bathroom, and ultimately, we concluded that covering up the pink tile would just mean putting lipstick on a pig. She saved up for a full renovation instead of throwing money at superficial fixes.
Final Thoughts
Bathroom renovations have this reputation for being expensive nightmares, and sometimes they are. But they don’t have to be.
The bathrooms I’m proudest of, both my own and those I’ve helped others with, aren’t the ones with marble countertops and rainfall showerheads. They’re the ones where thoughtful, strategic updates created spaces that feel clean, functional, and intentionally designed, all without requiring a home equity loan.
Can you transform a bathroom for $500? Absolutely. Paint, new hardware, updated lighting, a new mirror, and some thoughtful accessories will make a remarkable difference. Will it look like a $15,000 renovation? No, but it doesn’t need to. It just needs to look better than it did and work better for how you actually live.
Start with one or two projects from this list. See how they feel. Build from there. Renovations don’t have to happen all at once, and sometimes the constraint of a tight budget forces more creativity and intentionality than unlimited funds ever would.
Your bathroom doesn’t need to look like a design magazine spread. It just needs to be a place you don’t actively dislike using every morning. And that’s entirely achievable, even on a budget.